Your online booking page is often the first place customers interact with your business. Whether you run a restaurant, salon, clinic, or coaching service, a simple and flexible booking experience can make the difference between a completed appointment and a customer who leaves.
With Odoo 20 Appointments, booking becomes more convenient for both customers and your team. Customers can now select the person or resource, date, and available time slot from a single page, making the booking process faster and easier. They can also add accessory products at checkout and, if their plans change, reschedule their appointment directly from the website without having to contact your team.
Odoo 20 also improves appointment management on the backend. Your team can reschedule booked appointments in just a few clicks, while the improved availability information in the Gantt and Calendar views makes it easier to identify genuinely available slots and avoid scheduling conflicts.
Where These Changes Make a Difference
In this guide, we'll explore these new Odoo 20 Appointment features, see how they work, learn how to configure them, and cover a few things to check before making them available to your customers.
Part of our Odoo 20 coverage: Odoo 20 features and upgrade guide
What's new in Odoo 20 Appointments?
Accessory products
Accessory products at checkout. Appointments now supports selecting accessory products during checkout, so customers can add accessory products to a booking.
Booking flow
One-page booking flow. Choosing a user or resource now happens on the same page as choosing the date and time, instead of as a separate first step.
Rescheduling
Appointment rescheduling. Reschedule booked appointments in just a few clicks. Customers are also given the option to reschedule their appointment and confirm the new time.
Availability
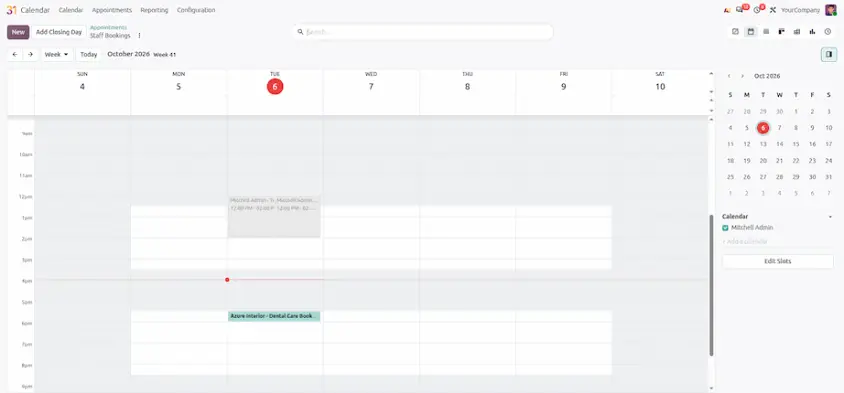
Accurate availability display. Availabilities are displayed accurately in the Gantt and calendar views across different appointment types, and private events marked as busy are taken into account.
The same release also adds easier views of booked appointments in the Gantt and calendar, showing customer name, appointment type and seats.
| Change | What it does | Where you see it |
|---|---|---|
| Accessory products at checkout | Customers can add suggested accessory products to a booking while checking out. | Website checkout |
| One-page person/resource and time choice | Choose the user or resource on the same page as the date and time. | Website booking page |
| Richer booked-appointment views | Shows customer name, appointment type and seats on booked appointments. | Gantt and calendar views |
| Appointment rescheduling | Reschedule booked appointments in just a few clicks. Customers can also reschedule and confirm the new time. | Website confirmation page and backend |
| Accurate availability display | Shows true availability across appointment types and treats private events marked as busy as busy. | Gantt and calendar views |
Why it matters
These four changes make booking easier for customers and help businesses get more bookings and sales.
Easy booking
Customers can choose the person and time on one page, with fewer clicks.
More sales
Customers can add extra products or services while booking.
Less manual work
Staff do not need to call or message customers to offer extra products.
Better planning
Customers can easily see which person or time is available.
Easy rescheduling
Customers can change their booking time themselves without losing the booking.
Accurate availability
The website shows only the time slots that are actually available.
Prerequisites
Get these in place before you configure the appointment type.
Accessory products at checkout
With Odoo 20 Appointments, customers can now add accessory products during the checkout process, immediately after selecting their appointment slot.
You can offer relevant products such as drinks and desserts for a restaurant, add-on services for a salon, upgrades for a coaching session, or retail products for a clinic. When customers reach checkout, Odoo displays the available accessory products and lets them add the products they want or skip them and continue with the appointment. The appointment can be completed either way.
This gives you an easy way to increase sales without adding extra work for your staff. Customers see relevant add-ons while they are already ready to complete their booking, making it easier to turn a regular appointment into a higher-value purchase.
In the sections below, we'll cover what you need before setting up accessory products, how to configure them in Odoo 20, and what the customer sees during checkout.
Step-by-step Configuration
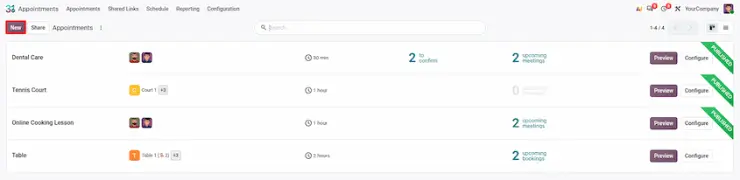
Create the appointment type. Open Appointments and click New. Enter a title (for example, "Table"), set the Duration (2h) and the Location.
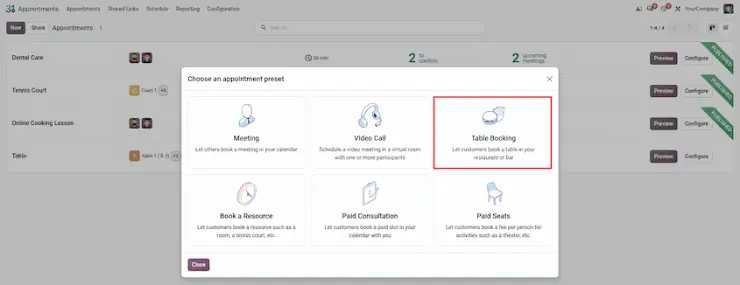
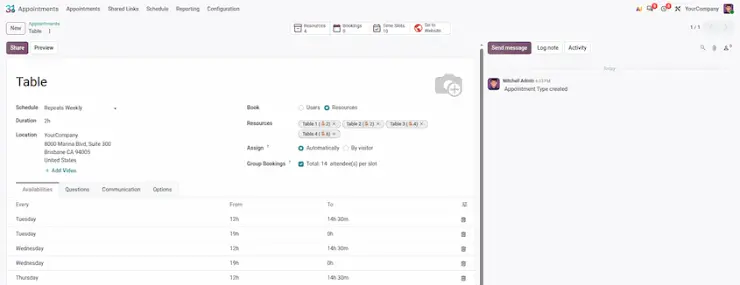
Set the schedule. Choose how availability repeats (for example, weekly) and add the days and hours in the Availabilities tab, such as Tuesday to Saturday for lunch and dinner service.
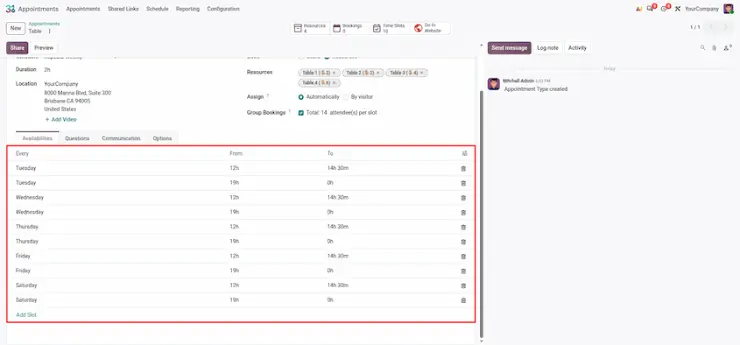
Choose who or what is booked. In the Book field, select Users for staff or Resources for rooms, tables or equipment, then add them. Odoo shows each resource's capacity.
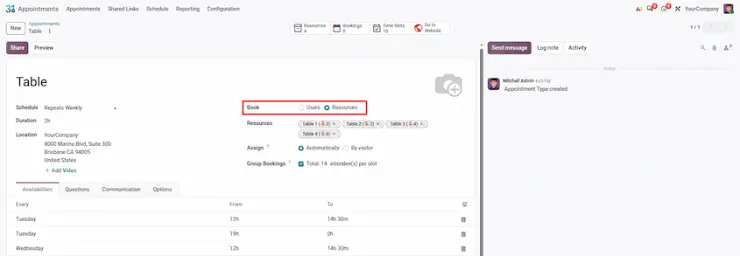
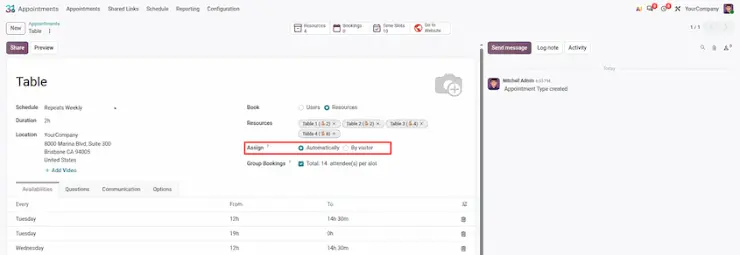
Let the customer pick. Set Assign to By visitor. The customer then chooses the table and the time slot on the same page. Automatically assigns a resource after the customer picks a time.
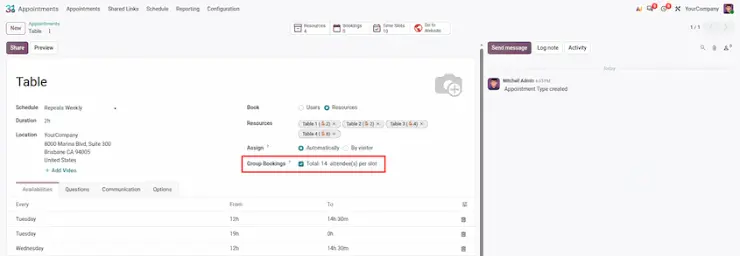
Allow groups if needed. Tick Group Bookings and set the total attendees per slot to cap how many people can book the same slot.
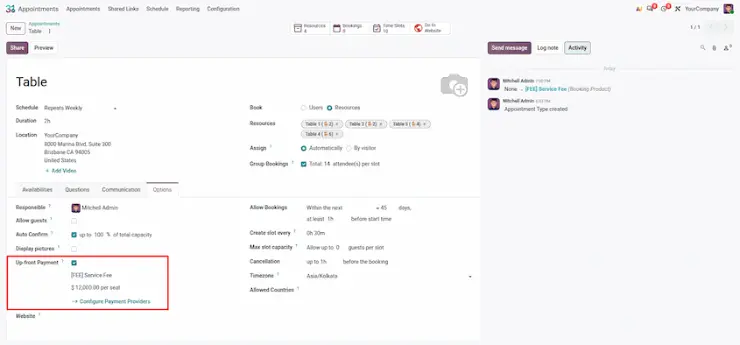
Attach the booking product. Select the service product that represents the booking, such as a service fee. This makes the appointment payable.
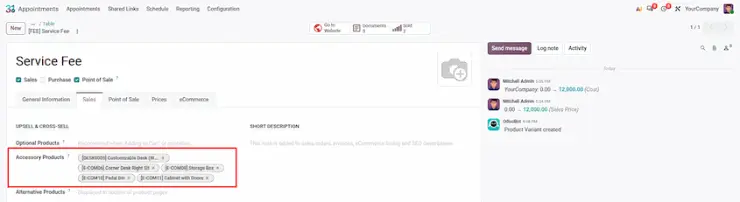
Add the accessory products. Create the add-on products, then list them as Accessory Products in the Sales tab of the booking product. This mirrors how accessory products work in Odoo eCommerce.
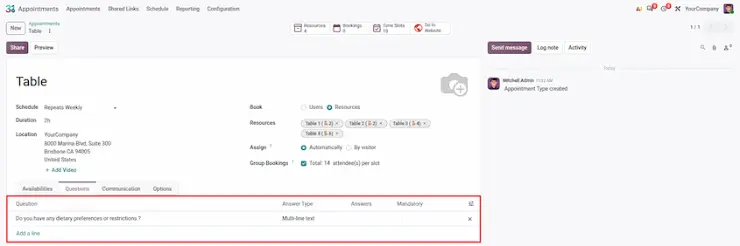
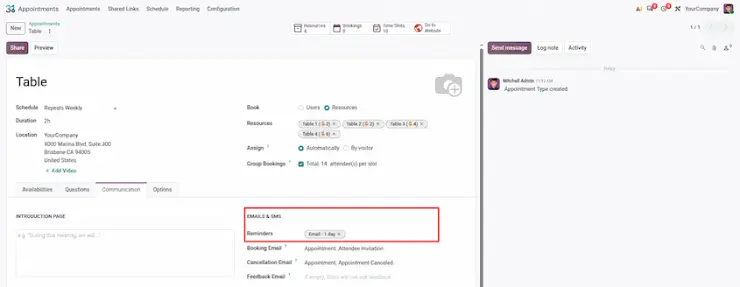
Add questions and reminders. Use the Questions tab for details such as allergies or occasion, and the Communication tab for confirmations and reminders.
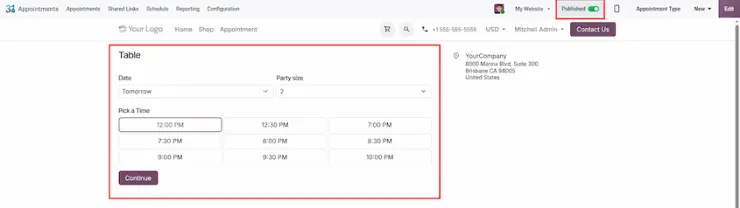
Publish and test. Use Preview or Go to Website, then book a slot yourself and complete a test payment.
The customer experience
From choosing a booking to completing payment, the customer moves through a simple flow with all the important steps connected.
Choose a booking
Select the appointment type directly from the website.
Pick a time
Choose the table or person and available time slot on the same page.
Add your details
Enter contact information and answer any booking questions.
Review and add extras
Review the booking and add suggested accessory products, or continue without them.
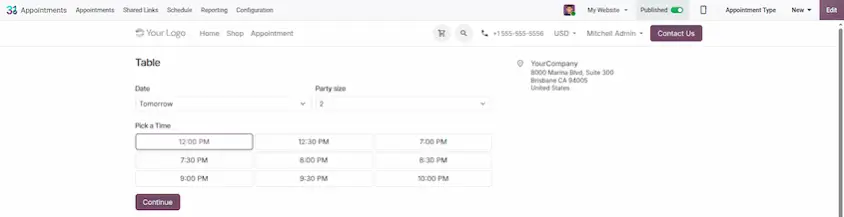
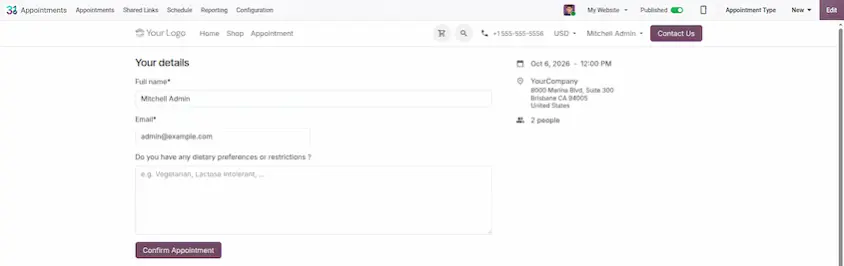
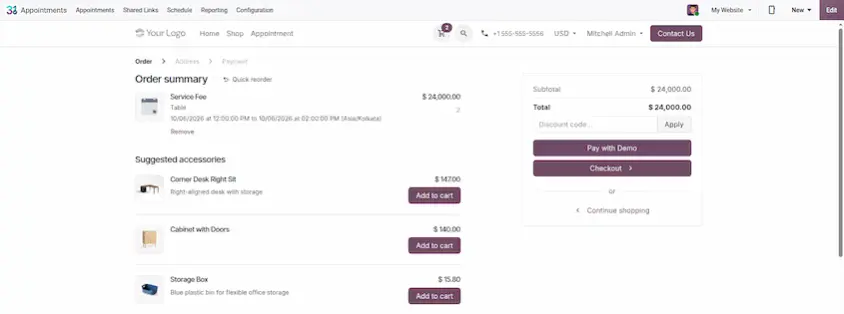
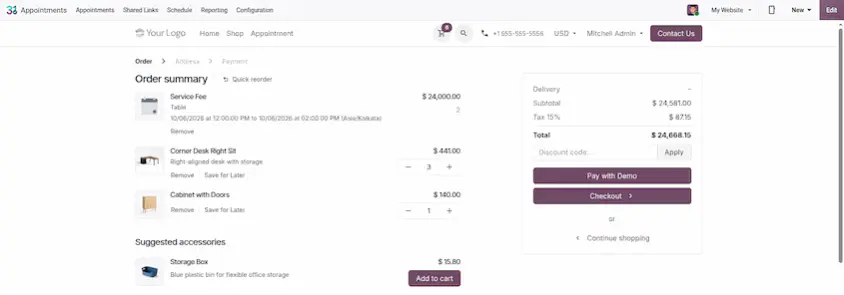
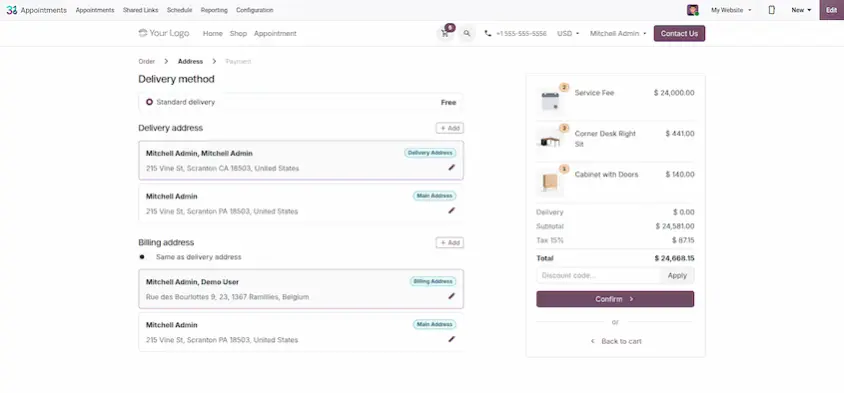
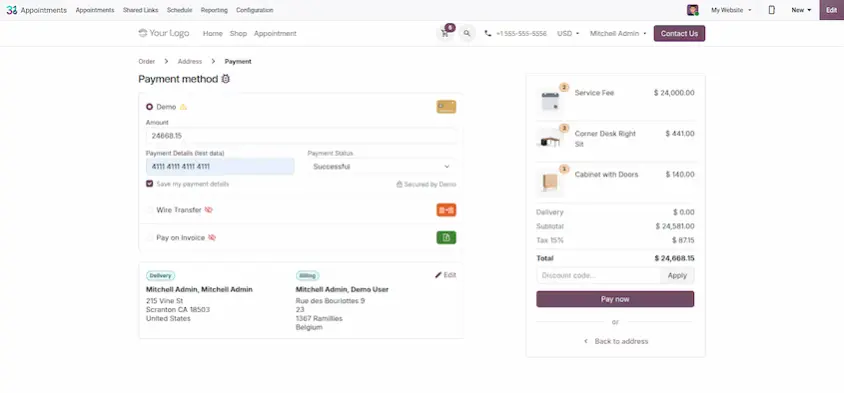
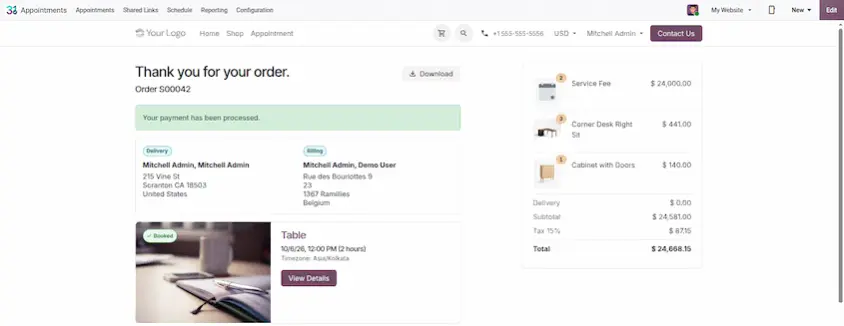
The key point is that accessory products appear as suggestions, never as a blocker. A customer who skips them still completes the booking.
Appointment rescheduling
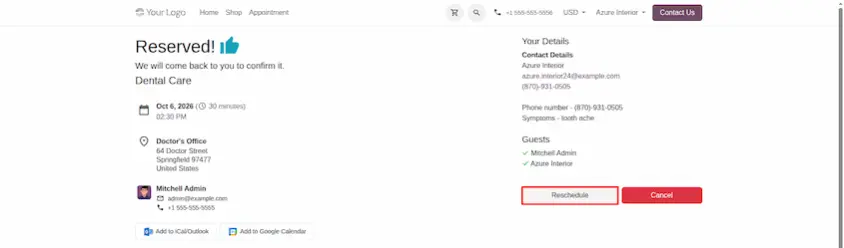
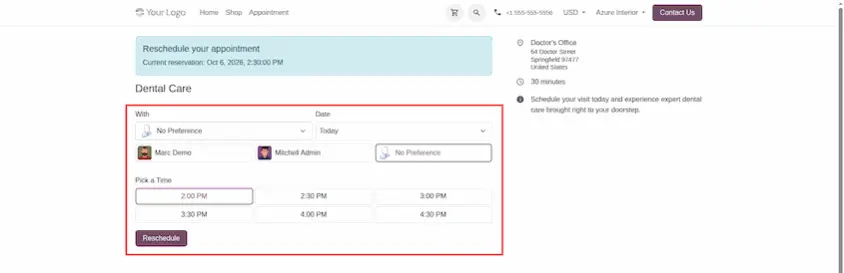
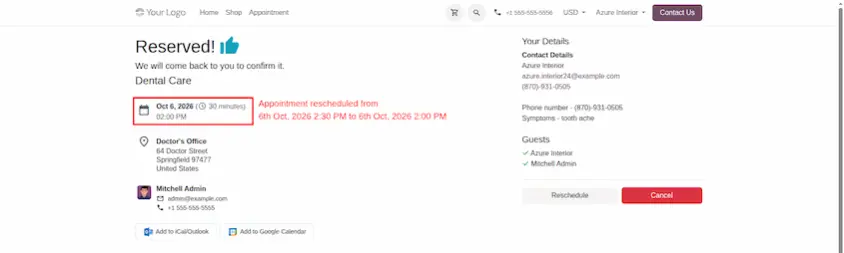
Customers can reschedule their appointments directly from the booking confirmation and confirm a new time without contacting your team.
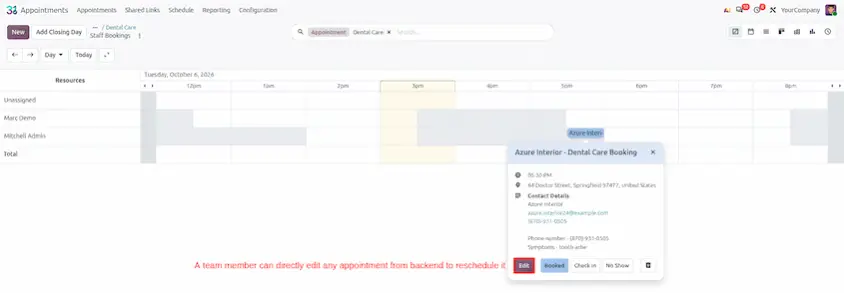
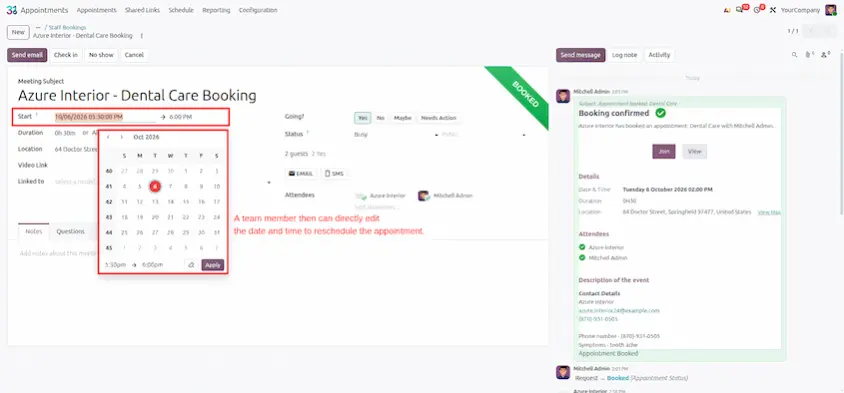
A customer may need a different day, or a team member may need to move an existing booking. With Odoo 20, team members can reschedule booked appointments in just a few clicks by selecting a new available date and time. Customers can also reschedule their own appointments from the confirmation page and confirm the new time themselves, without cancelling and booking again. This helps reduce cancellations, avoid unnecessary back-and-forth communication, and gives both your team and customers more flexibility.
Accurate availability display
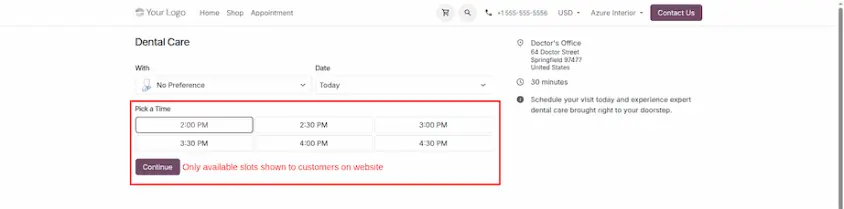
Customers only see time slots that are actually available. Odoo 20 now considers private calendar events marked as Busy when calculating appointment availability, giving customers a more reliable choice of time slots.
Availability is also shown more accurately in the Gantt and Calendar views across different appointment types. If you or a team member has a private event marked as busy, Odoo automatically treats that time as unavailable for appointments.
In simple terms, if a meeting already blocks a time slot, Odoo will not show that slot as free. This helps your team avoid double bookings and ensures customers only see appointment times that can really be booked.

Best practices and use cases
Accessory products work best when they are closely related to the booking and easy for customers to understand.
Where it fits
Restaurants
Add drinks, desserts, celebration packages, or other extras to a table booking.
Salons and spas
Offer treatment upgrades, care products, or additional services with an appointment.
Coaching and training
Include workbooks, course materials, or other useful resources with a session.
Rentals and venues
Add catering, equipment, or other accessories to a room or equipment reservation.
How to get the most from it
Keep the choice focused
Offer three to five relevant accessory products. Too many choices can slow checkout.
Make products easy to understand
Use short names, clear prices, and descriptions that explain the value of each extra.
Keep product data accurate
Make sure accessories are published, available where relevant, and configured with the correct taxes.
Choose the right assignment
Use By visitor for named people such as a stylist or doctor, and Automatically when any available resource can handle the booking.
Keep availability reliable
Mark private events as busy so customers only see genuinely available time slots.
Test the complete flow
Test the booking and checkout on a phone to make sure the experience stays quick and easy.
Before you go live, Check the booking and payment setup
Accessory selection happens during checkout, so make sure the appointment uses a payable booking product and that a payment provider is correctly configured and working before going live.
Odoo 20 helps both sides of a booking. Customers choose who and when in one step, add accessory products before paying, and can reschedule and confirm a new time themselves. Your team can reschedule booked appointments in just a few clicks and gets a true picture of availability in the Gantt and calendar views. Set up the appointment type, attach a booking product, link your accessory products, and test the full flow on desktop and mobile. Small accessory products offered at the right moment usually add revenue without extra staff effort.
Odoo 20 Appointments: Discover the New Appointment Booking Features