Odoo 20 delivers a transformative leap in Website and eCommerce capabilities. This section covers every major new feature from a business and user perspective — with screenshots, configuration guides, and real-world impact analysis.
1. New 'oi' Icon System
- Replaces all FontAwesome 4/5 icons across the website frontend
- Crisp at all resolutions — uses
data-iconattribute on<i class="oi oi-fw"> - Zero layout shift (CLS) — pre-calculated font metrics prevent page jump
<!-- Old (Odoo 17–19) -->
<i class="fa fa-shopping-cart"/>

<!-- New (Odoo 20) -->
<i class="oi oi-fw" data-icon="shopping_cart" role="presentation"/>
2. New Snippet Plugin Types: Carousel, Grid & Parallax
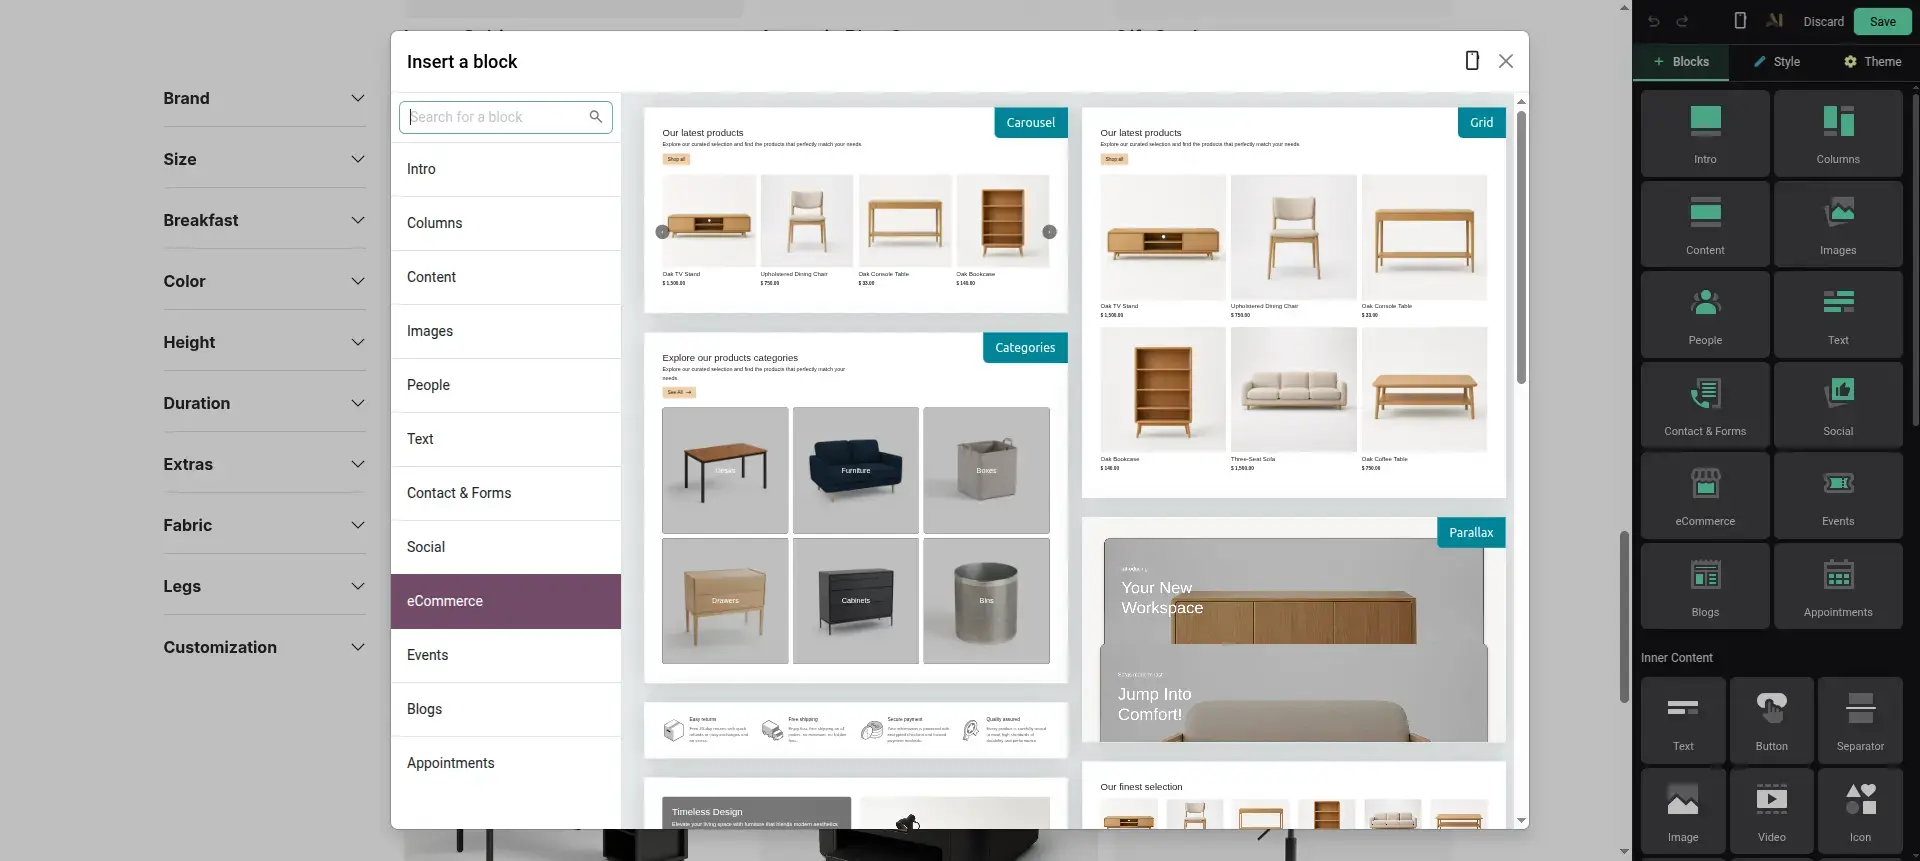
Every dynamic building block in Odoo 20 comes with an interactive layout plugin switcher in the builder's right sidebar. Content editors can switch any snippet between Carousel, Grid, and Parallax layouts without rebuilding the page.
2.1 Insert a Block: Ready-Made Layout Variants
In the website builder, open Blocks → eCommerce in the right sidebar. The "Insert a block" dialog now shows each building block in several layout variants, labelled Carousel, Grid, Categories and Parallax, so you can pick the layout visually before dropping it on the page.
2.2 Carousel Layout
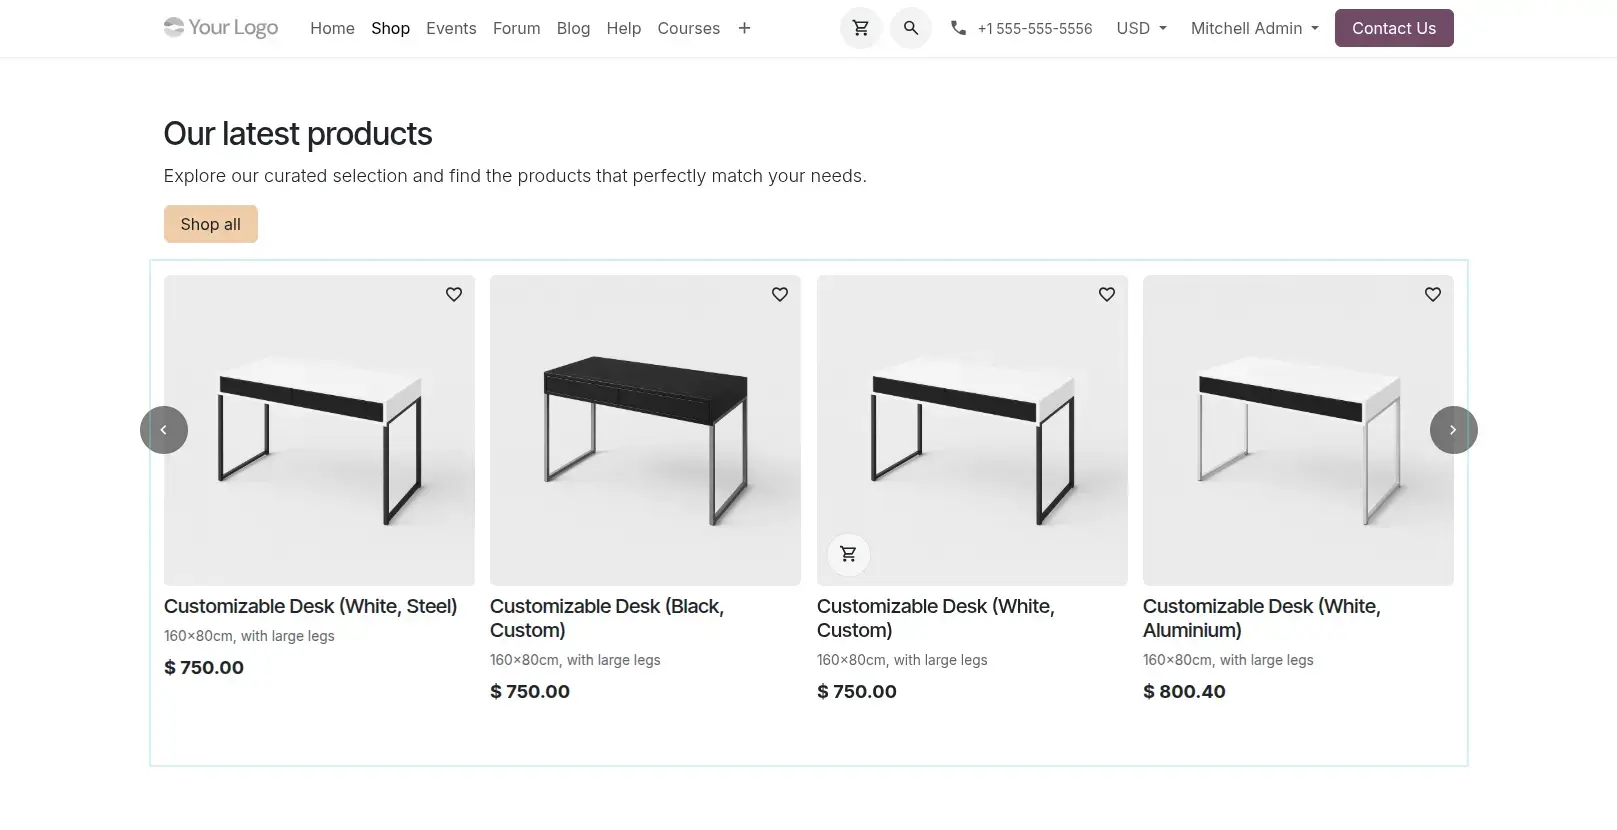
The Carousel layout shows products in a single row with previous/next arrows. Visitors slide through the selection without leaving the page, which keeps a long product list compact.
- Heading, short description and a "Shop all" button sit above the product row
- Each card shows the product image, name, variant description, price and a wishlist heart
- Arrow buttons on both sides move to the next set of products
2.3 Grid Layout
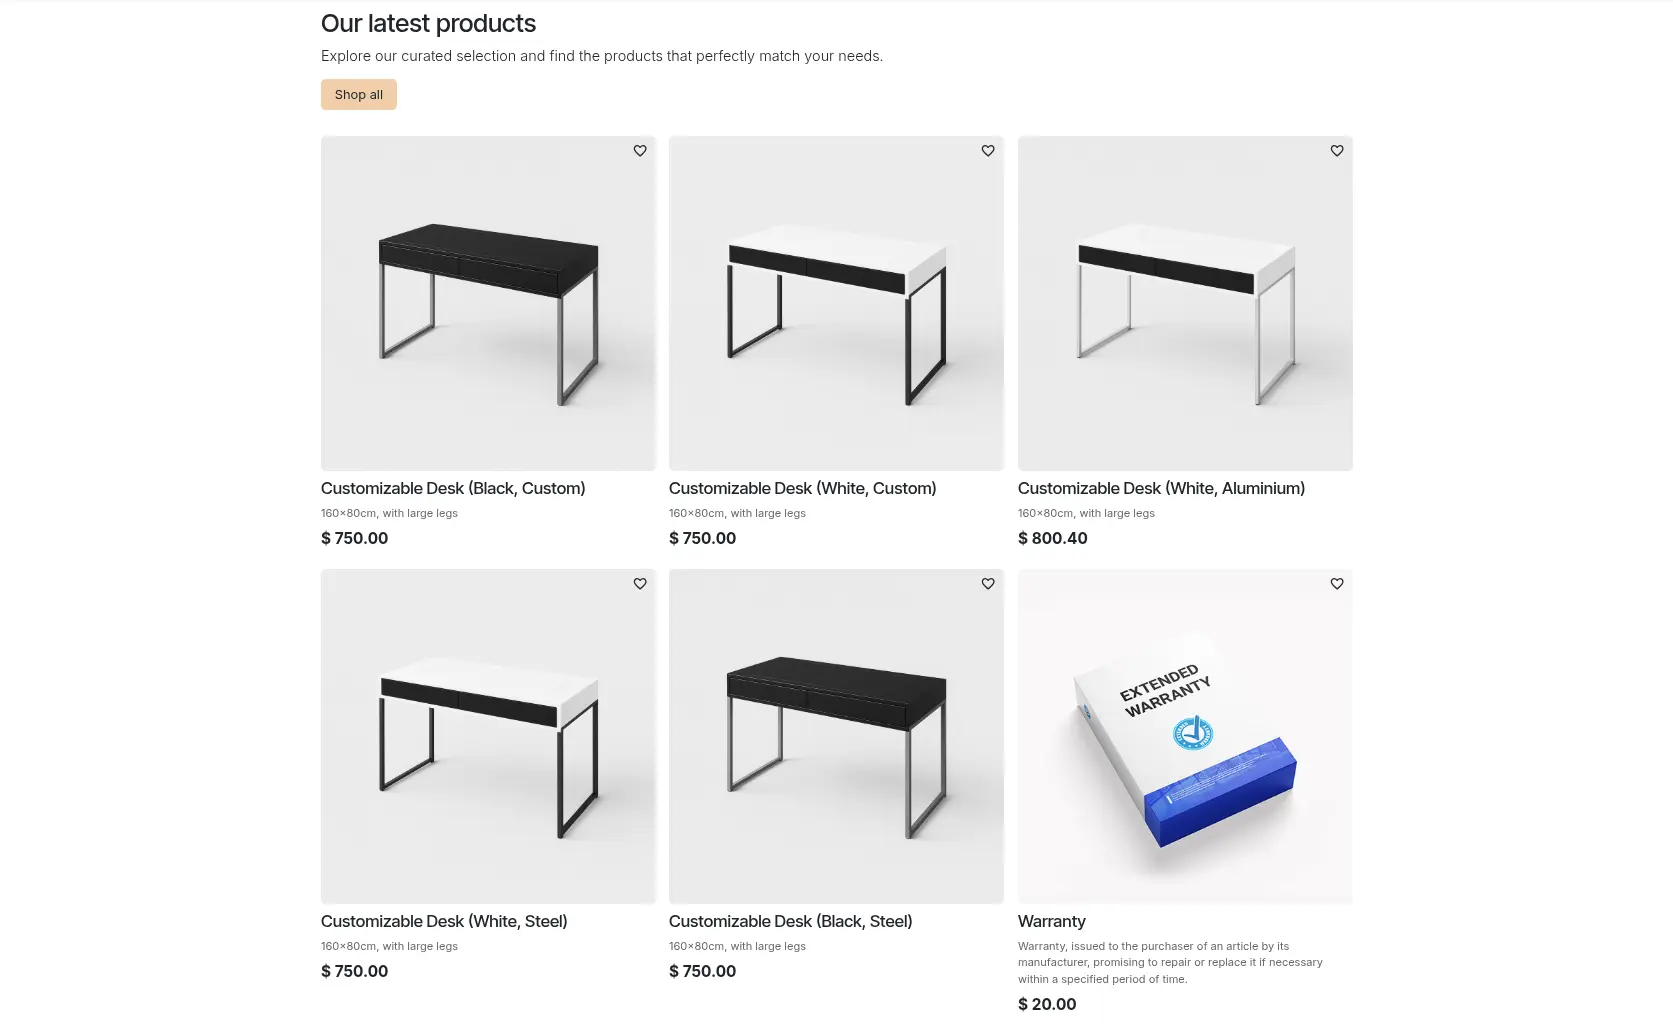
Switching the same block to Grid shows all selected products at once in a responsive multi-column layout. No arrows or sliding are needed, and the page height grows with the number of products.
- Same content as the carousel: image, name, variant description, price, wishlist heart
- Products wrap onto new rows, so every item stays visible without interaction
- Product descriptions (for example on the Warranty item) can show more lines than variant products
2.4 Categories Block
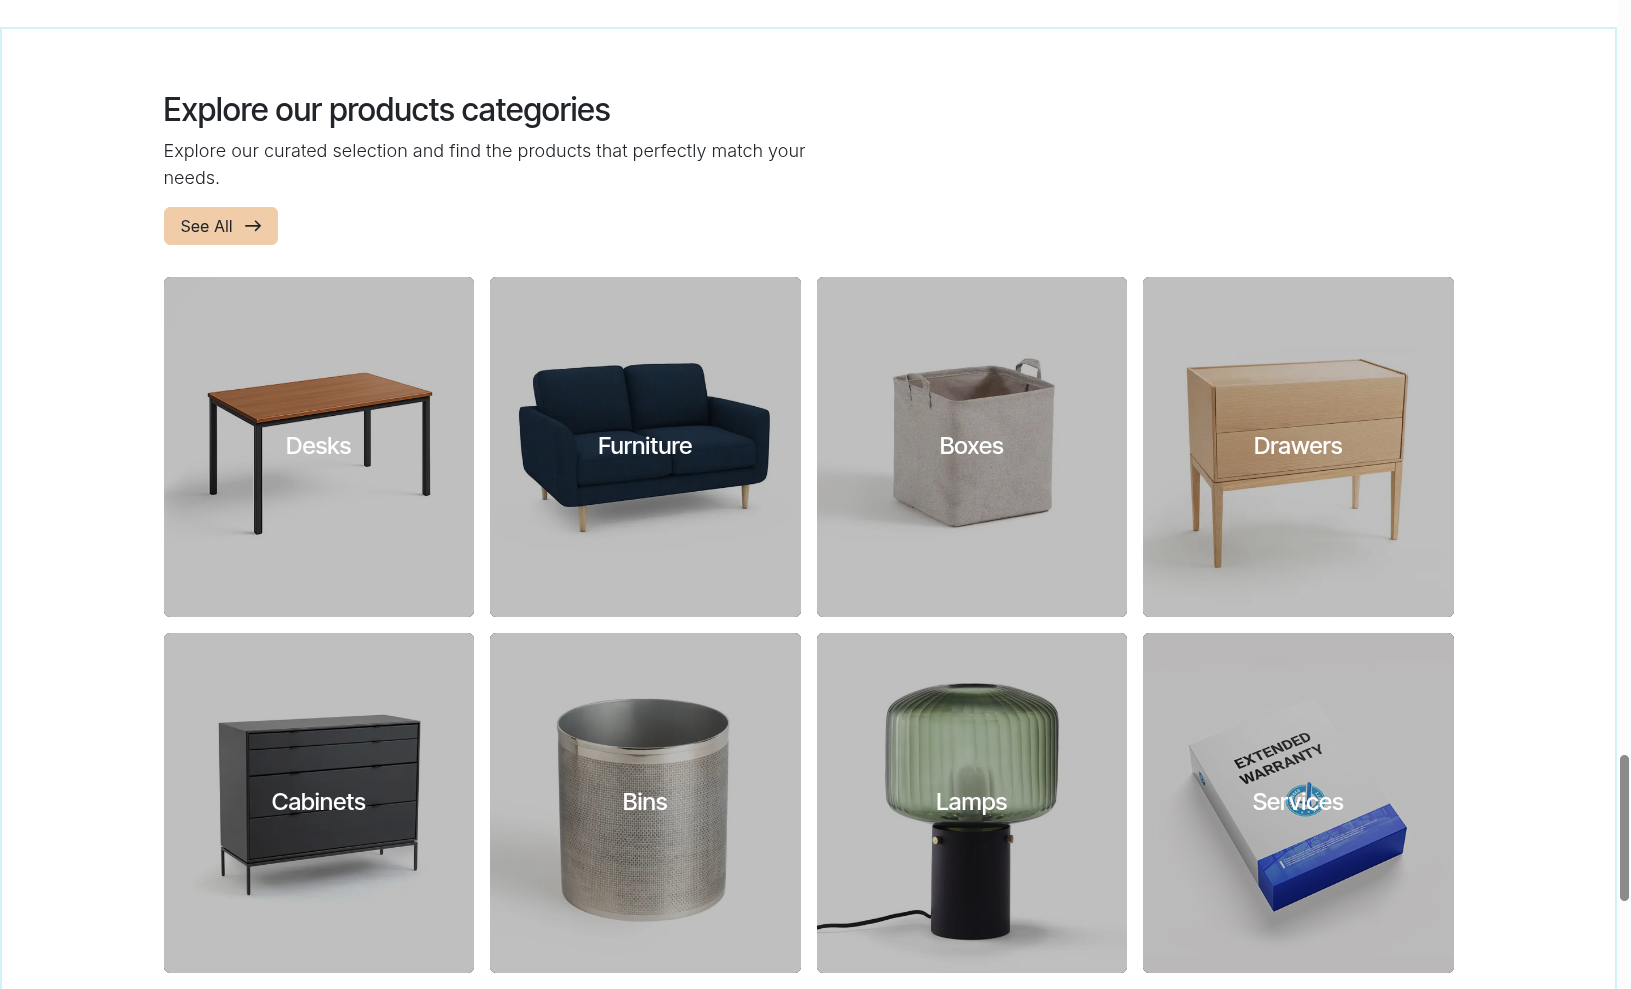
The Categories variant turns product categories into large image tiles with the category name overlaid. It works well as a visual entry point to the shop.
- Four tiles per row on desktop, with the category name centered on each image
- A "See All" button next to the heading links to the full shop
- Examples in the demo data: Desks, Furniture, Boxes, Drawers, Cabinets, Bins, Lamps, Services
2.5 Parallax Layout
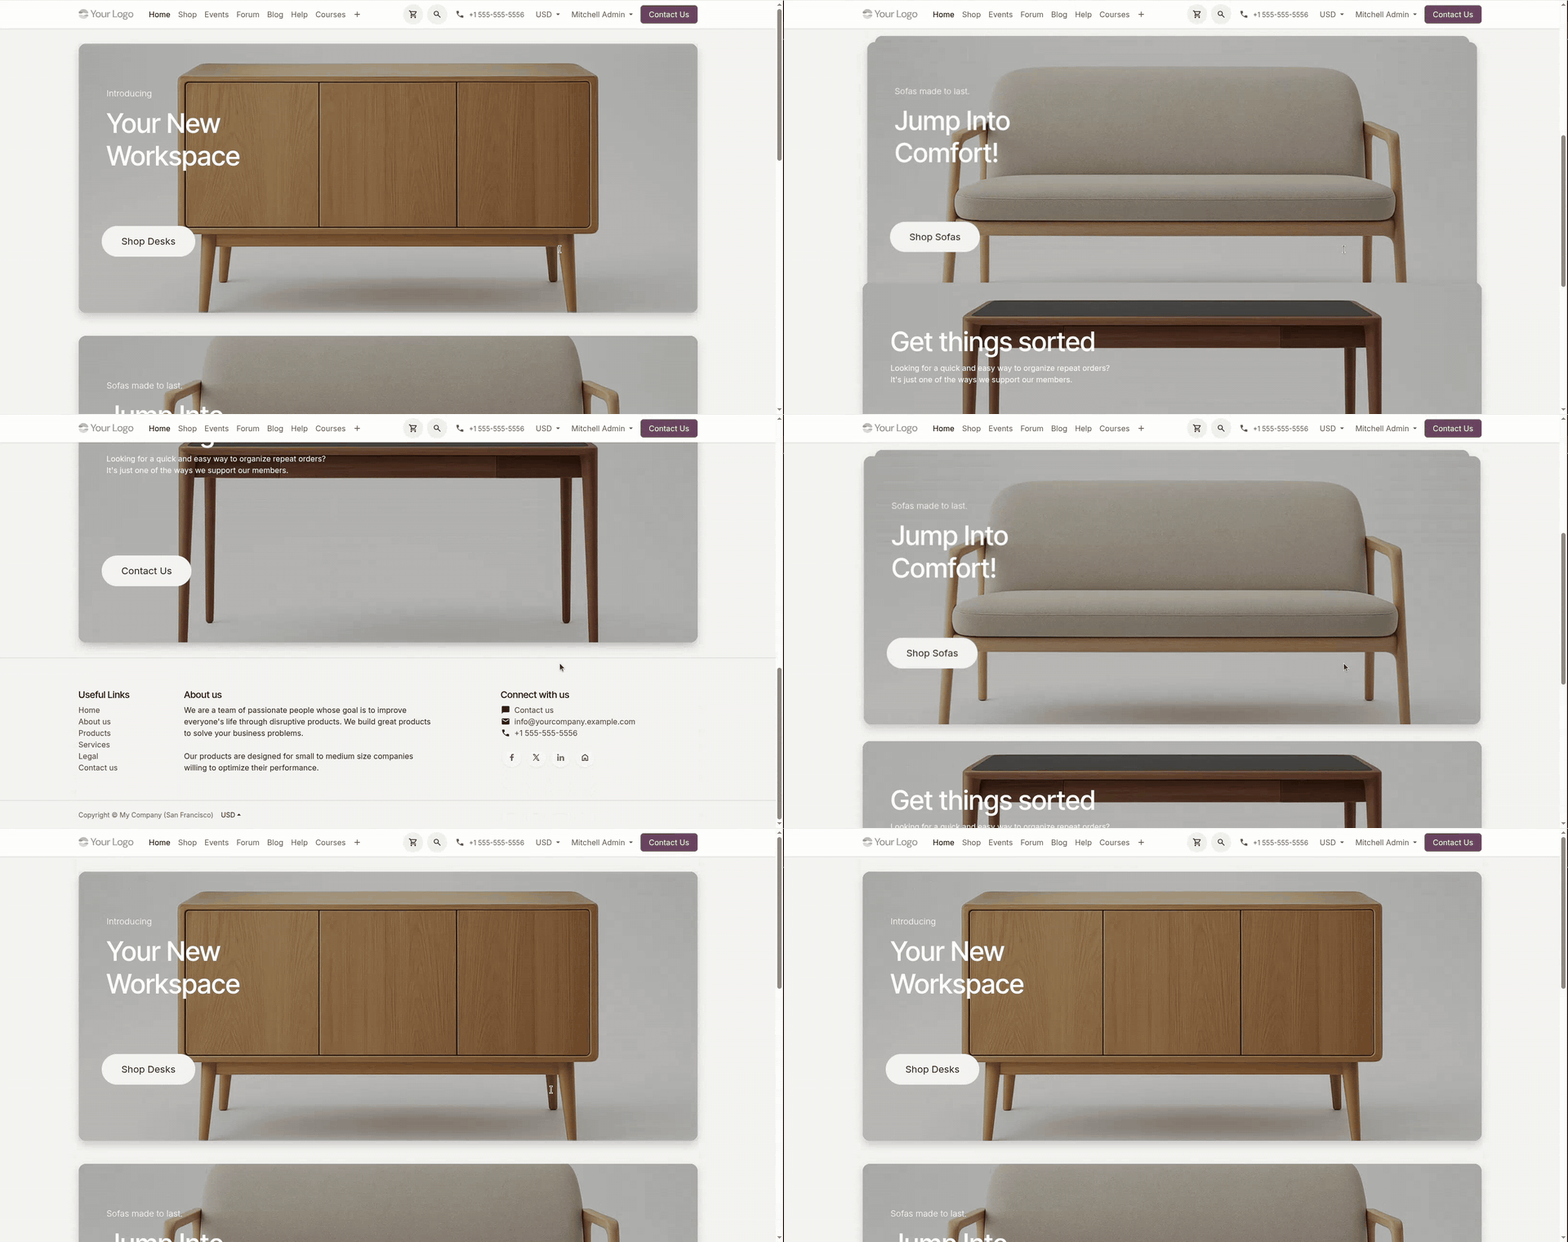
The Parallax layout stacks full-width banner cards, such as "Your New Workspace", "Jump Into Comfort!" and "Get things sorted". As the visitor scrolls, each card slides over the previous one at a different speed, creating a layered depth effect. Each card can carry its own intro text, heading, description and call-to-action button.
2.6 Dynamic Content Filters Available
| Filter Name | Data Source | Sort Order |
|---|---|---|
| All Products | product.product (website_published=True) | website_sequence asc |
| Newest Arrivals | product.product | publish_date desc |
| Recently Sold | sale.order.line (state: sale/done) | create_date desc |
| Recently Viewed (User) | Visitor session history | last_visit desc |
| Accessories for Product | product_template.accessory_product_ids | website_sequence asc |
| Products Sold With | Co-purchased items in the same order | frequency desc |
| Alternative Products | product_template.alternative_product_ids | website_sequence asc |
| Category List | product.public.category | website_sequence asc |
2.7 Products Grid Building Block
- A new grid version of the Products building block is now available
- The layout of the dynamic product building block has been improved
3. Dynamic Carousels: Events, Appointments & Blog Posts
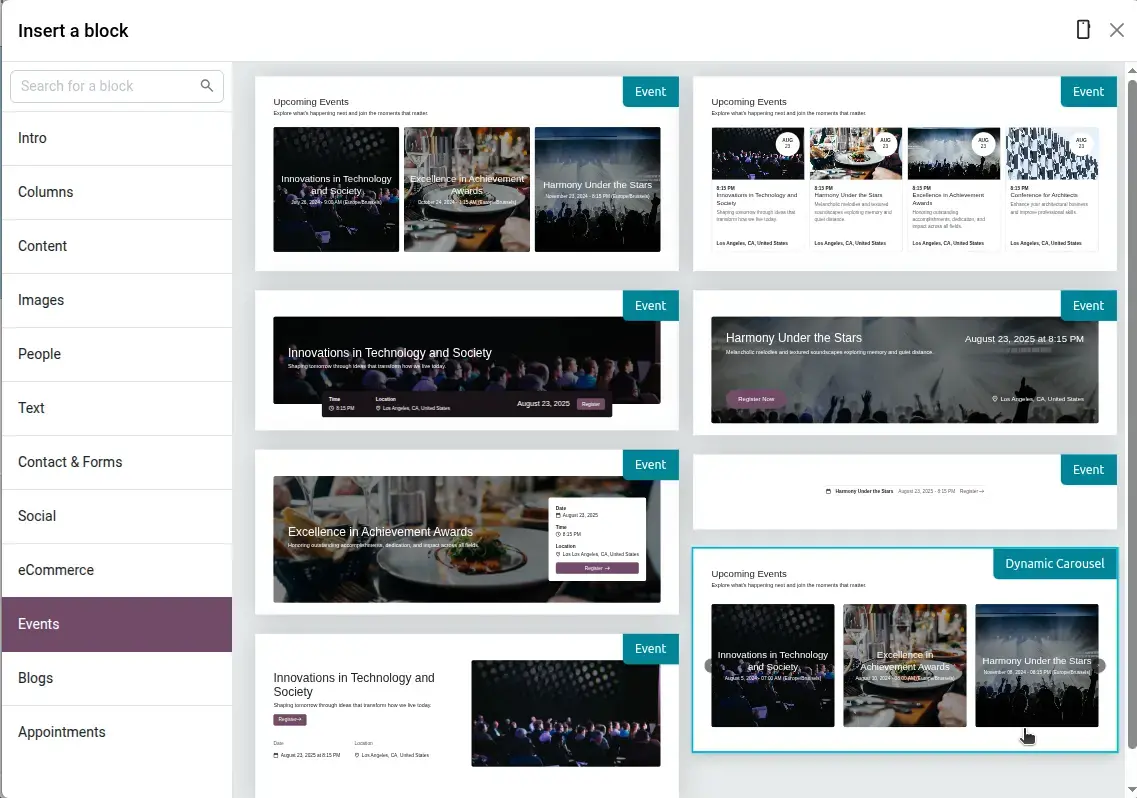
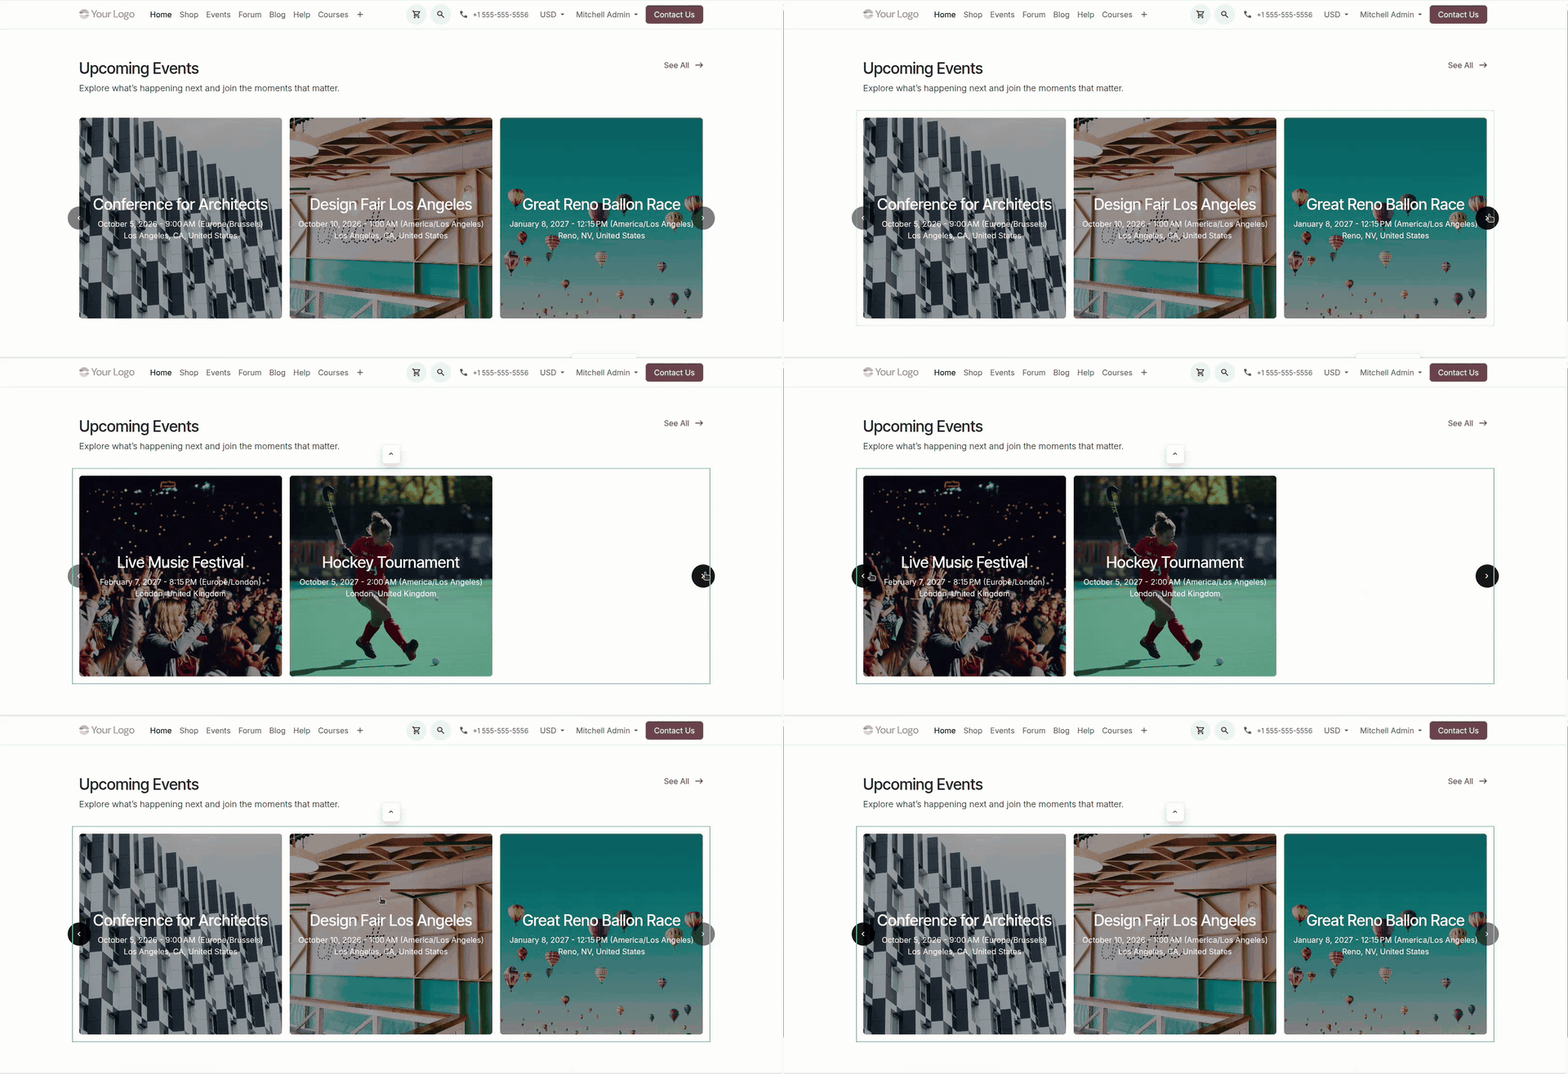
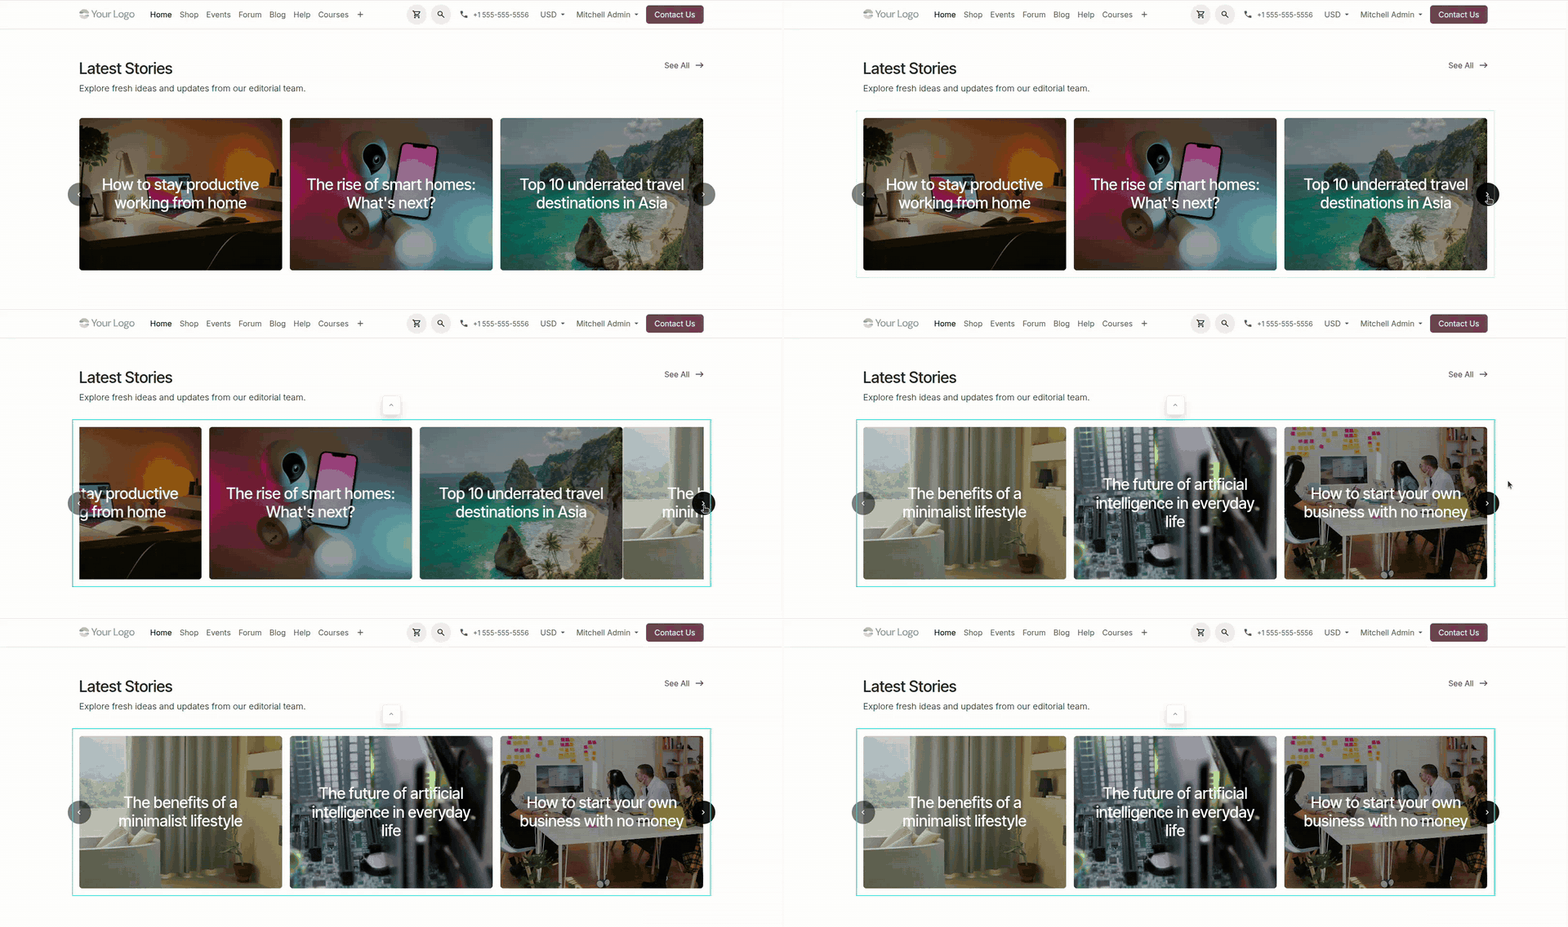
Beyond product carousels, Odoo 20 introduces three new dynamic carousel types that auto-populate from live backend records, removing the need for any manual content updates.
3.1 Events Dynamic Carousel (website_event)
- Pulls live data from
event.event— dates, speakers, venues, ticket status - Auto-flags: "Sold Out", "Last Few Seats", "Registration Closing Soon"
- Builder sidebar: filter by category, country, and date range
- 1-click "Register Now" CTA links directly to the event registration flow
- Supports Carousel, Grid, and Parallax layout modes
3.2 Appointments Dynamic Carousel (website_appointment)
- Displays staff/consultant profiles with photos, specializations, star ratings
- Shows live "Next Available" slot — e.g. "Today at 3:30 PM"
- "Book Slot" opens the scheduling calendar modal directly on-page
- Syncs to
calendar.event; optionally creates CRM pipeline leads on booking - Configurable: show/hide staff ratings, service descriptions, time slots
3.3 Blog Posts Dynamic Carousel (website_blog)
| Filter | Domain | Sort |
|---|---|---|
| Latest Blog Posts | [('published_date', '<=', 'now')] | published_date desc |
| Most Viewed Blog Posts | [('published_date','<=','now'), ('visits','!=',False)] | visits desc |
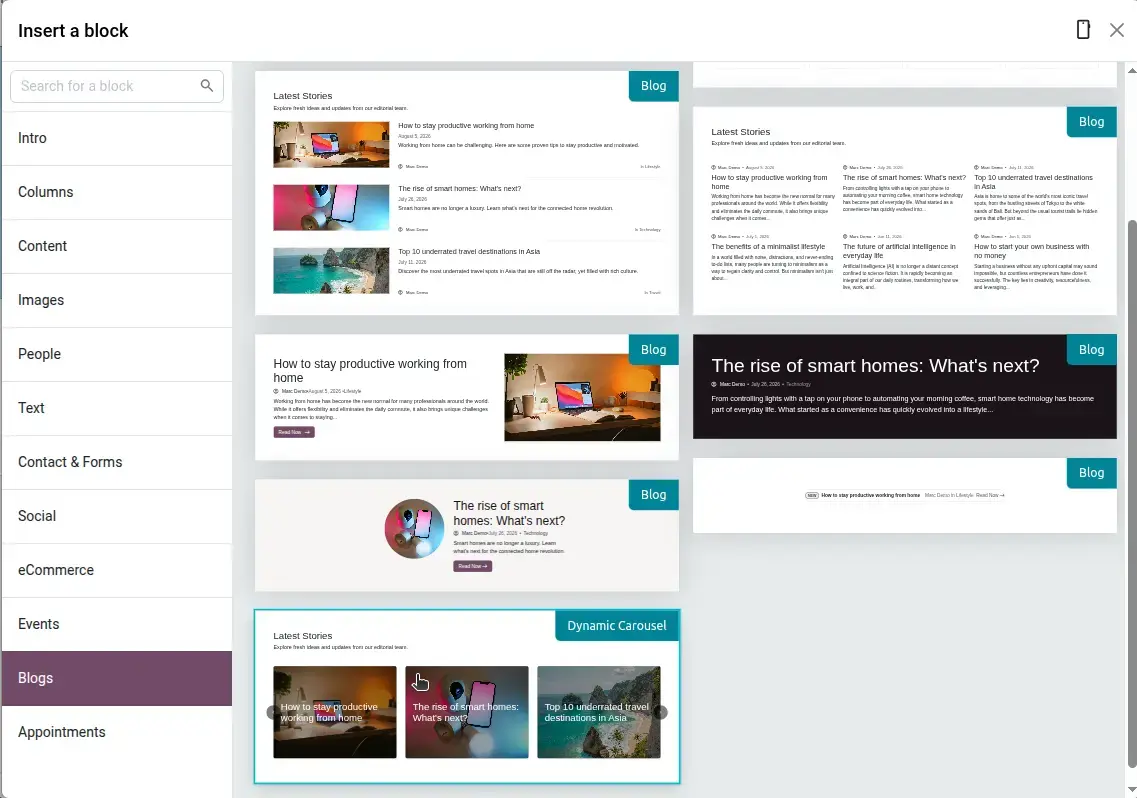
- Cards display: cover image, category tag, title, author avatar, published date
- "Read More →" link drives traffic directly to the full blog post
4. LLMs.txt — Built-In AI Discovery File
Odoo 20 lets you create and serve an llms.txt file directly from the website settings, with no extra module. Based on the llmstxt.org proposal, this plain markdown file is served at /llms.txt and gives AI models (ChatGPT, Gemini, Claude and others) a short, curated guide to your website: who you are, what you offer, and where the important pages are.
4.1 llms.txt vs robots.txt vs sitemap.xml
Web pages are built for people, with menus, ads and scripts around the content. AI models work better with a short, clean summary. llms.txt sits next to the files you already know, but it has a different job.
| File | Main Reader | Purpose |
|---|---|---|
robots.txt | Search engine crawlers | Tells crawlers which pages or files they can or cannot request |
sitemap.xml | Search engines | Lists all indexable pages of the site |
llms.txt | AI models and agents | A short, curated overview of your content, used when an AI needs information about your site |
4.2 Where to Find It in Odoo 20
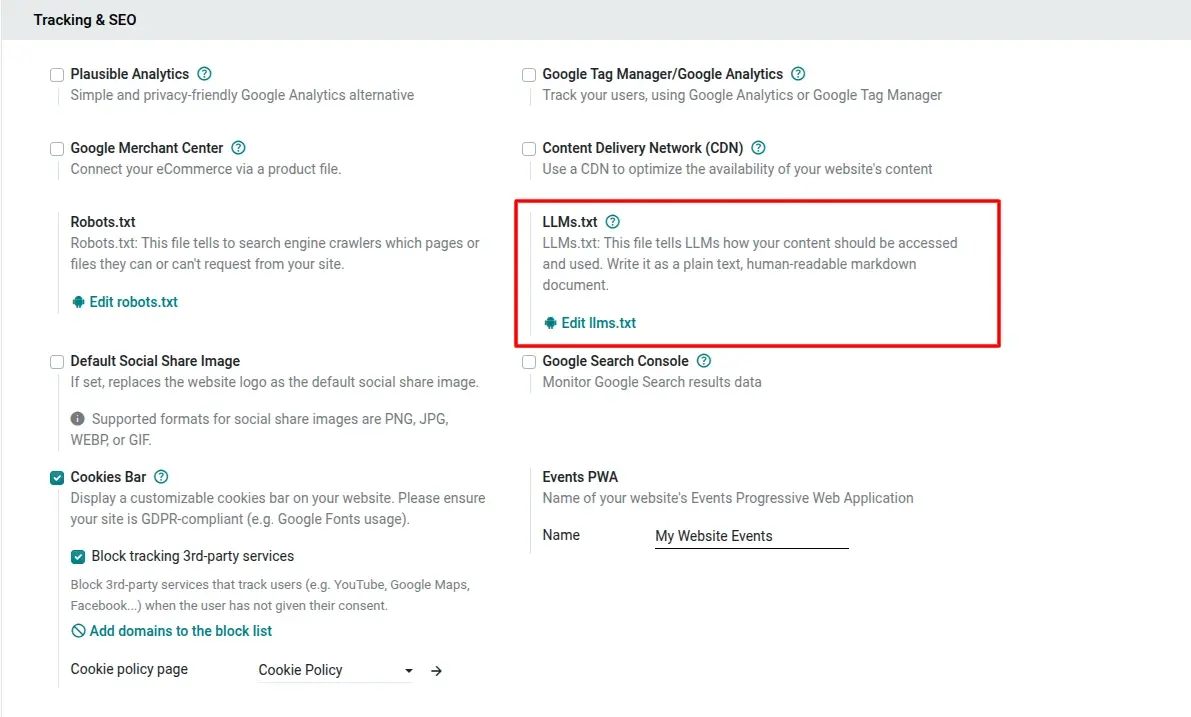
The setting sits in the Tracking & SEO section of the website settings, right next to Robots.txt.
- Go to Website → Configuration → Settings
- Scroll to the Tracking & SEO section
- Find the LLMs.txt block on the right, beside Robots.txt
- Click Edit llms.txt
What the setting says
The help text explains that this file tells LLMs how your content should be accessed and used, and asks you to write it as a plain-text, human-readable markdown document.
4.3 Editing the File
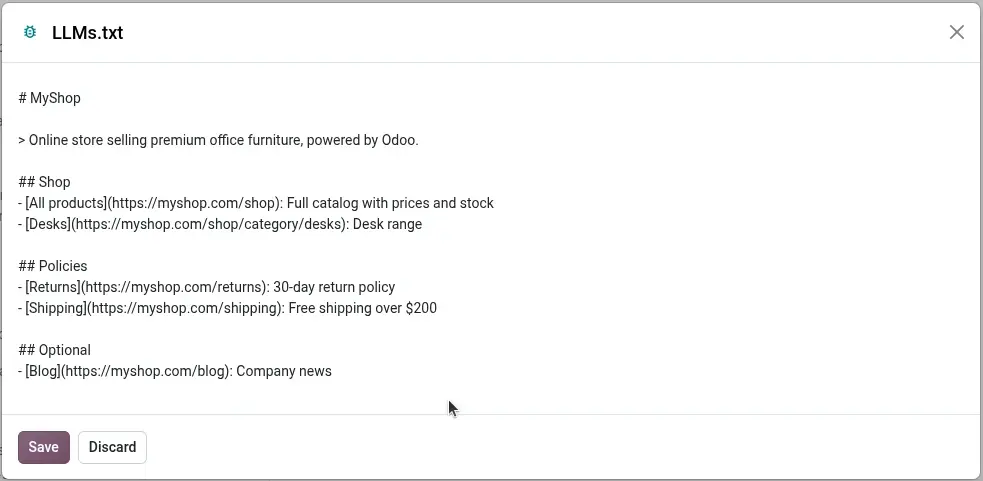
Clicking Edit llms.txt opens a dialog titled "LLMs.txt" with a plain text area. Type or paste your markdown, then click Save. Use Discard to close without saving.
4.4 File Format
| Element | Markdown | Required? |
|---|---|---|
| Site name | # MyShop (H1 heading) | Yes, the only required part |
| Short summary | > Online store selling... (blockquote) | Optional |
| Link sections | ## Shop followed by a list of links | Optional |
| Link entry | - [Name](url): short note | Name and URL required, note optional |
| Secondary links | ## Optional section | By convention, links an AI can skip when it needs less context |
Tips for a good llms.txt
Keep it short and use clear language. Describe each link in a few words. Include your company summary, main shop categories and policies such as returns and shipping. Test it by giving only this file to an AI and asking questions about your site.
5. Click & Collect — Pick Up at Location Feature
| Checkout Step | Customer Experience |
|---|---|
| Product Page | Shows "Pickup available" for the store and a "Delivery from" date for shipping |
| Delivery Method | 3 options: Standard delivery, Local Delivery, Pick up in store (all Free in the demo data) |
| Store Selector | "Pickup Location" dialog with an interactive map, store pin, address and opening hours |
| Confirm Location | Customer clicks "Choose this location" → store is locked to the order and can be changed with the pencil button |
| Payment | Pay on Site or standard online payment gateway |
| Collection Email | Store address, opening hours, and QR code for pickup |
5.1 Product Page: Pickup Availability
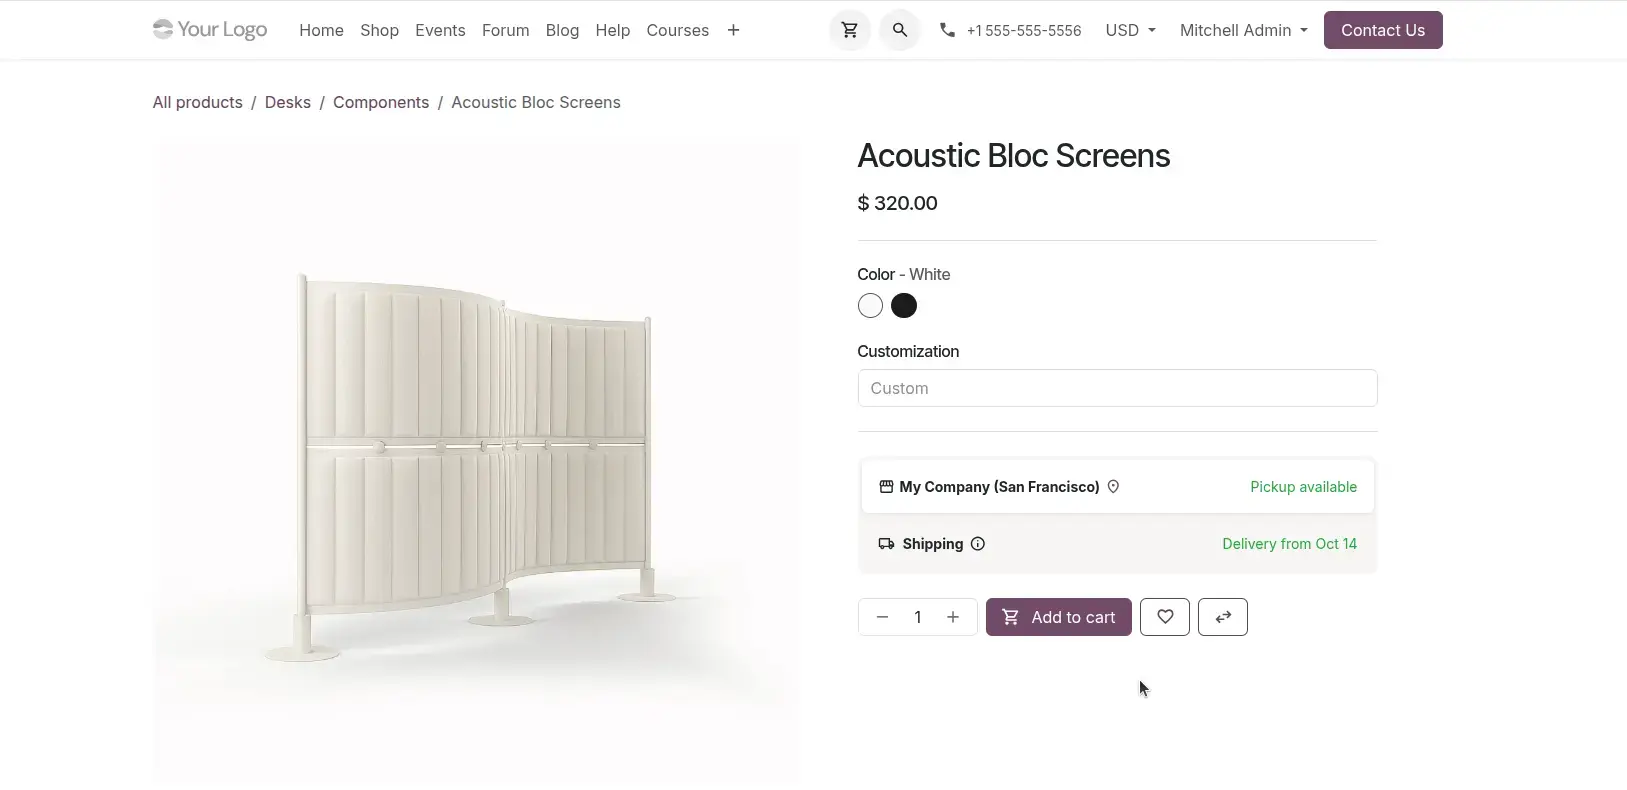
Availability is shown on the product page itself, before the customer adds anything to the cart. Below the variant options, an availability panel lists each pickup store and the shipping option.
- The store name (for example "My Company (San Francisco)") appears with a green Pickup available label
- A separate Shipping line shows the estimated delivery date, for example "Delivery from Oct 14"
- The customer sees both fulfilment options next to the quantity selector and the Add to cart button
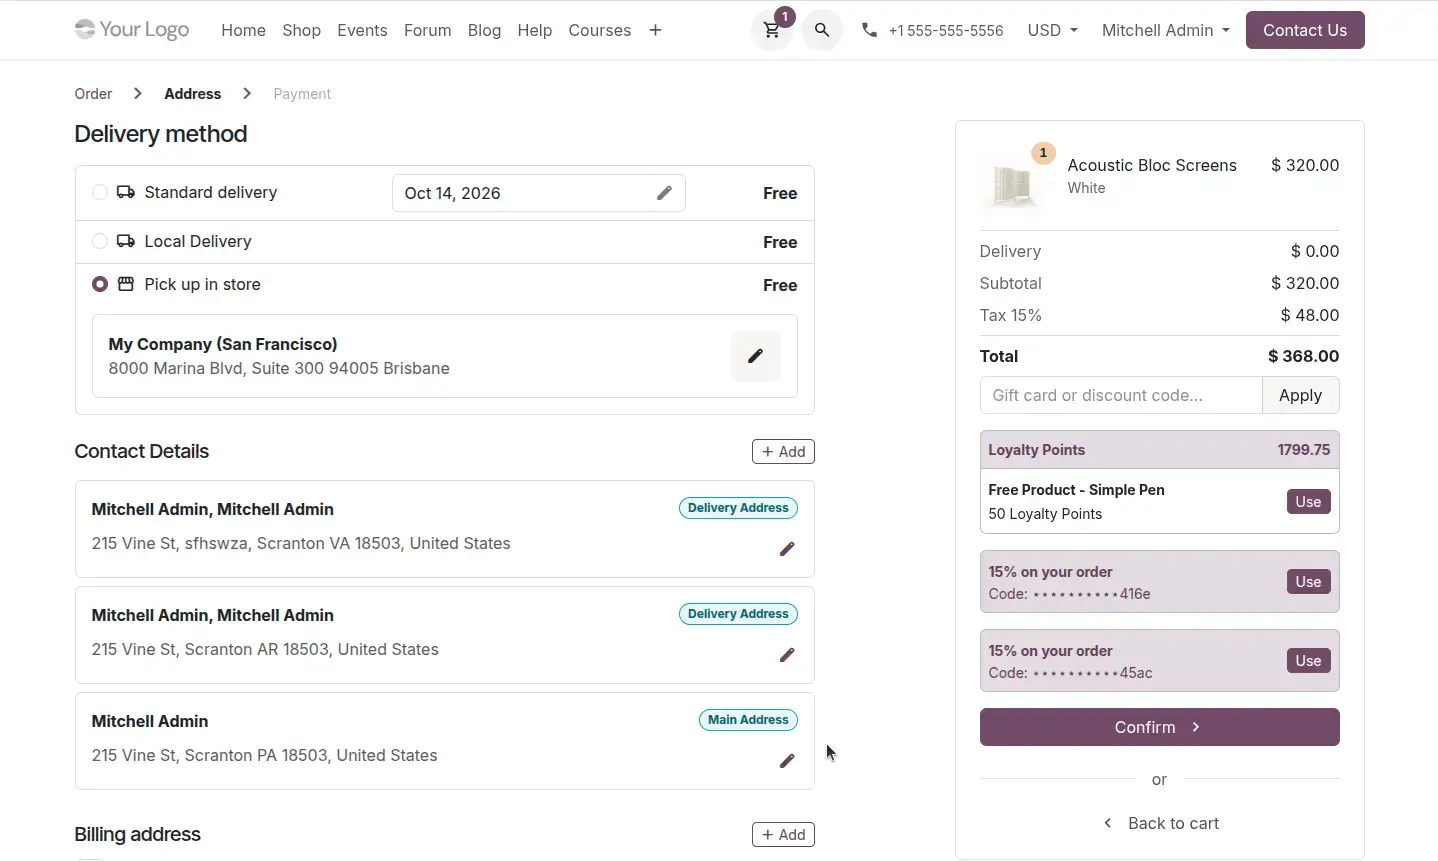
5.2 Checkout: Choosing "Pick up in store"
On the checkout Address step, the Delivery method block lists every enabled delivery option. When the customer selects Pick up in store, the chosen store is displayed underneath the option.
- Delivery options shown: Standard delivery, Local Delivery and Pick up in store
- Standard delivery includes an editable delivery date field (for example "Oct 14, 2026"), which is the preferred delivery date feature described later in this guide
- For Pick up in store, a card shows the store name and address, with a pencil button to change the store
- The order summary on the right shows the product, delivery cost, subtotal, tax and total, plus the gift card / discount code field and any available loyalty rewards
- The flow continues with the Confirm button to the Payment step
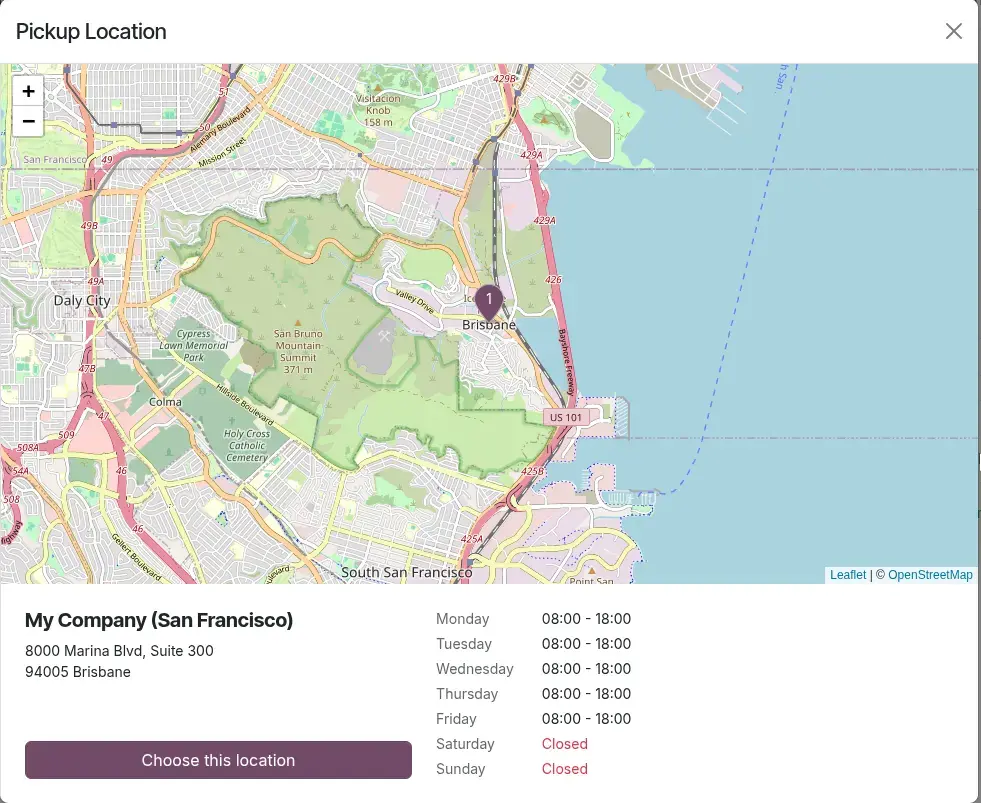
5.3 Pickup Location Dialog
Clicking the pencil button (or choosing a store) opens the Pickup Location dialog, where the customer sees exactly where the store is and when it is open.
- Interactive map with zoom controls (+ / −) and a numbered pin for each pickup store
- Store name and full address under the map, for example "My Company (San Francisco), 8000 Marina Blvd, Suite 300, 94005 Brisbane"
- Weekly opening hours listed day by day, with closed days highlighted in red (Saturday and Sunday in the demo data)
- A Choose this location button confirms the store and returns to checkout
5.4 Location Selector: Country Filter
- Customers can filter pickup points by country in the selection dialog
5.5 Backend Configuration
- Enable: Website → Settings → Shipping → Click & Collect
- Configure warehouses: Inventory → Warehouses → 'Pickup Allowed' checkbox
- Set geo-location per warehouse: Inventory → Warehouses → Address & Geolocation
- Dependencies:
base_geolocalize,payment_custom,website_sale_stock
6. Pay on Site Payment Method
'Pay on Site' is a new payment provider option introduced with the Click & Collect module. It appears at checkout only when 'Pick up in Store' delivery is selected.
- Provider type:
payment.customsubtype (payment_provider_on_site) - Order state after placement:
'sent'withpending_payment=True - Staff confirms cash/card payment at counter → order transitions to
'done' - Fully compatible with Odoo POS for in-store payment confirmation flow
7. AI-Powered Snippet Customization (Command-to-Code)
One of the most innovative features in Odoo 20: users type plain-English commands in an AI chat panel, and the AI modifies website snippets in real time — no coding required.
| Step | Description |
|---|---|
| 1. Select Snippet | Click on any snippet in the Website Builder canvas |
| 2. Open AI Panel | Click the AI icon in the snippet toolbar |
| 3. Type Command | e.g. 'Add count-up animation to these numbers on page load' |
| 4. AI Processes | Analyzes the snippet's current HTML/CSS/JS context |
| 5. Code Applied | Updated snippet renders live in the editor canvas |
| 6. Save/Discard | Accept the AI edit with one click, or revert |
7.1 Example AI Commands
- "Add a count-up animation to these numbers on page load"
- "Make this section dark background with white text"
- "Add hover zoom effect to product images in this grid"
- "Make the newsletter button pulse every 3 seconds"
- "Add a floating Back to Top button to this page"
8. AI-Powered SEO Optimization
Odoo 20 integrates AI directly into the SEO Properties panel, allowing users to auto-generate optimized meta titles, descriptions, and keyword tags for any page or product with a single click — no copywriting expertise required.
8.1 How It Works
- Open any page or product in the website editor
- Click Properties → SEO (or the SEO icon in the top bar)
- Click 'Generate with AI' next to the Meta Title, Meta Description, or Keywords field
- AI reads the page content, product description, and existing category context
- Fields are auto-populated with SEO-optimized copy following best practices:
- Meta Title: 50–60 characters, includes primary keyword and brand
- Meta Description: 150–160 characters, compelling CTA with primary + secondary keywords
- Keywords: 5–8 relevant search terms as comma-separated chips
- User can edit, regenerate, or accept the suggestions then Save
8.2 Supported Content Types
| Content Type | AI Context Used |
|---|---|
| Product Page | Product name, description, category, price, attributes |
| Blog Post | Title, teaser, tags, author, publication date |
| Static Page | Page title, all text content blocks, headings |
| Event Page | Event name, description, date, venue, speaker list |
| Course Page | Course title, slide titles, channel tags |
9. Variant Thumbnail Management from Product Images
In Odoo 20, merchants can assign specific images as the thumbnail for each product variant directly from the product's image gallery — without navigating to separate variant records. This makes managing multi-color or multi-variant products significantly faster.
9.1 How It Works
- Go to Website → Products → [Select Product] → Edit
- In the Image Gallery section, hover over any product image
- A 'Set as Variant Thumbnail' option appears on hover
- Click to open a dropdown showing all attribute combinations (e.g., Color: Red, Size: M)
- Select the variant(s) this image should represent
- The image is now the thumbnail shown in shop grids when that variant combination is selected
- On hover in the shop grid, switching between variants updates the product card thumbnail instantly
9.2 Business Impact
| Scenario | Before Odoo 20 | After Odoo 20 |
|---|---|---|
| Per-variant images | Navigate to each variant record separately | Managed inline from product image gallery |
| Shop grid hover | Only showed the default product image | Shows exact variant's assigned thumbnail |
| Multi-color products | No automatic color-image mapping | Each color swatch shows its correct product image |
Also new: central variant image management
Variant images can now also be managed centrally from the "eCommerce" tab of the product form. Enabling the "Show Thumbnails" field on an attribute makes the shop use product variant images instead of the attribute value display.
10. Free Shipping Progress Bar & Loyalty Points in Cart
Odoo 20 introduces a dynamic Free Shipping Progress Bar in the shopping cart and checkout, encouraging customers to add more items to reach the free shipping threshold. Loyalty point balances are also displayed live in the cart sidebar.
10.1 Free Shipping Progress Bar
- Full-width progress bar at the top of the cart summary panel
- Green gradient fill proportional to: cart total vs. free shipping threshold
- Dynamic message: 'Add $30.00 more for FREE shipping!' → 'You've earned Free Shipping!'
- Bar updates in real time as items are added or removed — no page reload
- Configuration: Website → eCommerce → Shipping → Delivery Methods → [Method] → Free Shipping Threshold
- Appears automatically when a delivery method has
free_over=Trueandamount_freeset - Powered by
sale_loyalty_delivery+website_sale_loyaltymodule integration - Progress bars also appear in cart notifications and the cart summary, showing progress towards unlocking a reward, and a success state once the reward is unlocked
10.2 Loyalty Points Display in Cart
- Shows points earned on current order: '+150 pts earned on this order'
- Shows current customer balance: 'Your balance: 2,450 pts'
- Points are computed live from the active loyalty program rules against current cart
- Module:
website_sale_loyalty
10.3 Technical Reference
| Component | Module | File |
|---|---|---|
| Free Shipping Logic | sale_loyalty_delivery | models/sale_order.py |
| Loyalty Cart Controller | website_sale_loyalty | controllers/delivery.py |
| Loyalty Order Model | website_sale_loyalty | models/sale_order.py |
11. Customer Preferred Delivery Date at Checkout
Odoo 20 allows customers to select or confirm their preferred delivery date directly on the checkout shipping page — eliminating back-office calls to adjust commitment dates. This feature uses an interactive date picker widget powered by the 'oi' icon system.
11.1 How It Works
When ONE delivery date is available (fixed estimate):
- Estimated delivery date shown as a read-only badge next to the shipping method name
- Example: 'Estimated Delivery: Mon, Oct 6'
When MULTIPLE delivery dates are available (date picker):
- An interactive date range picker widget appears next to the shipping method
- Customer selects their preferred delivery date from the available days
- Selection is saved as
commitment_dateon thesale.order - Inventory and logistics teams see the customer's preferred date on the picking record
11.2 Configuration
| Setting | Location |
|---|---|
| Enable delivery estimates | Inventory → Settings → Advanced Scheduling → Security Lead Time |
| Enable date picker | Delivery Method → enable_delivery_estimate = True + multiple available days |
| Available delivery days | Computed from dm._get_estimate_delivery_days() — carrier lead time + warehouse calendar |
12. Product Return from Customer Portal Sale Order
Odoo 20 allows customers to initiate product returns directly from their portal sale order. No backend staff intervention is needed for the return request — the customer drives the entire process from the customer portal.
12.1 How It Works
- Customer logs into the portal and navigates to My Orders
- Opens a fully delivered sale order
- Clicks the 'Return Items' button on the sale order portal page
- A return form wizard appears asking:
- Which items to return (with quantity picker per order line)
- Return reason (dropdown: Defective, Wrong Item, Changed Mind, Other)
- Optional notes/description
- Customer submits — a
stock.return.picking(reverse transfer) is automatically created - Customer receives confirmation email with return reference number and instructions
- Backend team sees the return picking in Inventory → Operations → Receipts
12.2 Return Status Visible in Portal
| Status | Description |
|---|---|
| Return Requested | Customer has submitted the return form |
| Return in Transit | Return picking validated, items being received |
| Refund Processed | Credit note issued and refund dispatched |
| Return Cancelled | Return request was cancelled or rejected |
13. Product Attribute Value Search
Odoo 20 extends the shop search engine so that customers can search by product attribute values directly — e.g., searching 'Red' or 'XL' finds all products with those attribute values, even if those terms don't appear in the product name or description.
13.1 How It Works
Customer types in the shop search bar:
- 'Red' → returns all products with Color = Red attribute value
- 'XL' → returns all products with Size = XL attribute value
- 'Cotton' → returns all products with Material = Cotton attribute value
- Attribute value search COMBINES with text search (name, description) using OR logic
In the Filter Sidebar:
- Attribute values listed as interactive filter chips with product count badges
- Multiple values WITHIN the same attribute = OR (any match)
- Values ACROSS different attributes = AND (must match both)
- Selected attribute filters are preserved across pagination via session storage
13.2 URL Scheme — Old vs New
| Version | URL Format |
|---|---|
| Old (Odoo 17–19) | /shop?attribute_values=1-2,3&attribute_values=4-5,6 |
| New (Odoo 20) | /shop?{attr_id}={value_ids} — cleaner backward-compatible dict |
Also new: product opens with the searched value selected
When a customer searches by attribute value (e.g. "black t-shirt") and clicks the product, it opens with that specific attribute value already selected.
14. AI-Assisted Product Editing from the Shop Page
Merchants can now ask the AI assistant to edit products without leaving the Shop page.
- Generate product images with the AI assistant
- Change a product name, price, or description with a plain-language request
- Works directly from the Shop page, so no trip to the backend product form is needed
15. Catalog & Product Discovery
Several changes make it easier for customers to find the right product, and for merchants to curate what the shop shows.
| Feature | What's New |
|---|---|
| Attribute filters | Filters now exclude values that are not relevant to the loaded page |
| Range filter for attribute values | Use the Range display type on numerical attributes so customers can filter with a range slider |
| Ribbon filters | Two new ribbon filters: On Sale and In Stock |
| Standalone categories | Hide specific categories from the Shop page so you can build website sections with curated product selections |
| Product reference price | Now displayed on all eCommerce pages by default |
| Product features on dynamic blocks | Ribbons, comparison price, attributes, and secondary images are now visible on dynamic product building blocks |
| Automated cross-sell suggestions | Automatically generate accessories, optional, and alternative products for your eCommerce products |
| External identifiers | Set external identifiers on attributes to match platform requirements for data feeds and microdata |
16. Pricing, Taxes & Sales Rules
New controls let one website serve different customer types and enforce ordering rules without custom code.
| Feature | What's New |
|---|---|
| Taxes included / excluded display | Set at pricelist level whether displayed prices include or exclude taxes |
| Pricelist selector | Now available on all pages of an eCommerce website |
| Minimum product quantity | Set a minimum order quantity for eCommerce products |
| Prevent sales by category | Block sales for an entire category while still displaying the price of its products |
| Restrict packagings per website | Units and packagings can now be restricted per website |
| Stock-based product publishing | Automatically unpublish and republish products based on their stock availability |
Use case: B2C and B2B on one website
Because the tax display setting sits on the pricelist, consumers can see tax-included prices while business customers see tax-excluded prices, all on the same website.
17. Checkout, Delivery & Inventory
The checkout flow gets finer control, and eCommerce can now run with a lighter inventory setup.
| Feature | What's New |
|---|---|
| Extra step granularity | Show the extra step in checkout only when the cart contains products from selected categories |
| Pay Now button | Edit and translate all "Pay now" buttons in the checkout |
| Default journal for eCommerce orders | Select a default accounting journal for all eCommerce orders |
| Guest orders: contact creation | Contacts created from guest orders are archived by default and unarchived if the customer creates an account |
| Location selector: country filter | Customers can filter pickup points by country in the selection dialog |
| Simplified inventory management | eCommerce works without installing the Inventory app: a single on-hand quantity is shown per product and no transfers are required |
Migration note: Mondial Relay
The Mondial Relay pickup point module for eCommerce has been removed. Mondial Relay is still available, alongside other pickup points, through Sendcloud. If you use it today, plan the switch before upgrading.
18. Marketing, Retention & Analytics
New tools help recover lost sales, collect reviews, and measure performance more accurately.
| Feature | What's New |
|---|---|
| Automated review requests | Automate customer review request emails and define how long after order confirmation the request is sent |
| WhatsApp abandoned cart follow-up | Send a WhatsApp message to follow up on abandoned carts |
| Google Analytics events | GA4 eCommerce event tracking coverage and data quality improved to fully comply with Google Analytics 4 specifications |
| Donations | Donations are integrated into the eCommerce cart flow, enabling recurring donations via subscriptions |
| Email gift card to recipient | Customers can email a gift card directly to a recipient after finalizing a purchase |
19. Order Management, Fulfilment & Compliance
Back-office teams get better visibility, and shops get support for legal and print-on-demand workflows.
| Feature | What's New |
|---|---|
| Order dashboard | A new dashboard in the order list view gives a quick overview of eCommerce orders and their status |
| Withdrawal requests | A new action is available for contact forms to manage withdrawal requests |
| Gelato: variant images | Specific print images can now be added per variant |
| Variant image management | Variant images can be managed centrally from the "eCommerce" tab of the product form (see section 17) |
20. Rental Toolbar — Search Rental Products by Date on the Shop Page
The Odoo 20 website builder adds a Rental option to the toolbar of the Products page. When it is switched on, a Start date / End date picker appears above the product grid, so customers choose their rental period first and then browse products priced for exactly those dates. The chosen period follows the customer from the shop to the product page, the cart, the confirmation page and the sales order in the backend.
Before you start
The toolbar only helps customers find products that are configured for rental and published on your eCommerce website. Section 25.1 shows how the rental product is set up in the backend, including its rental unit (for example Hours) and padding time.
20.1 Setting Up the Rental Product in the Backend
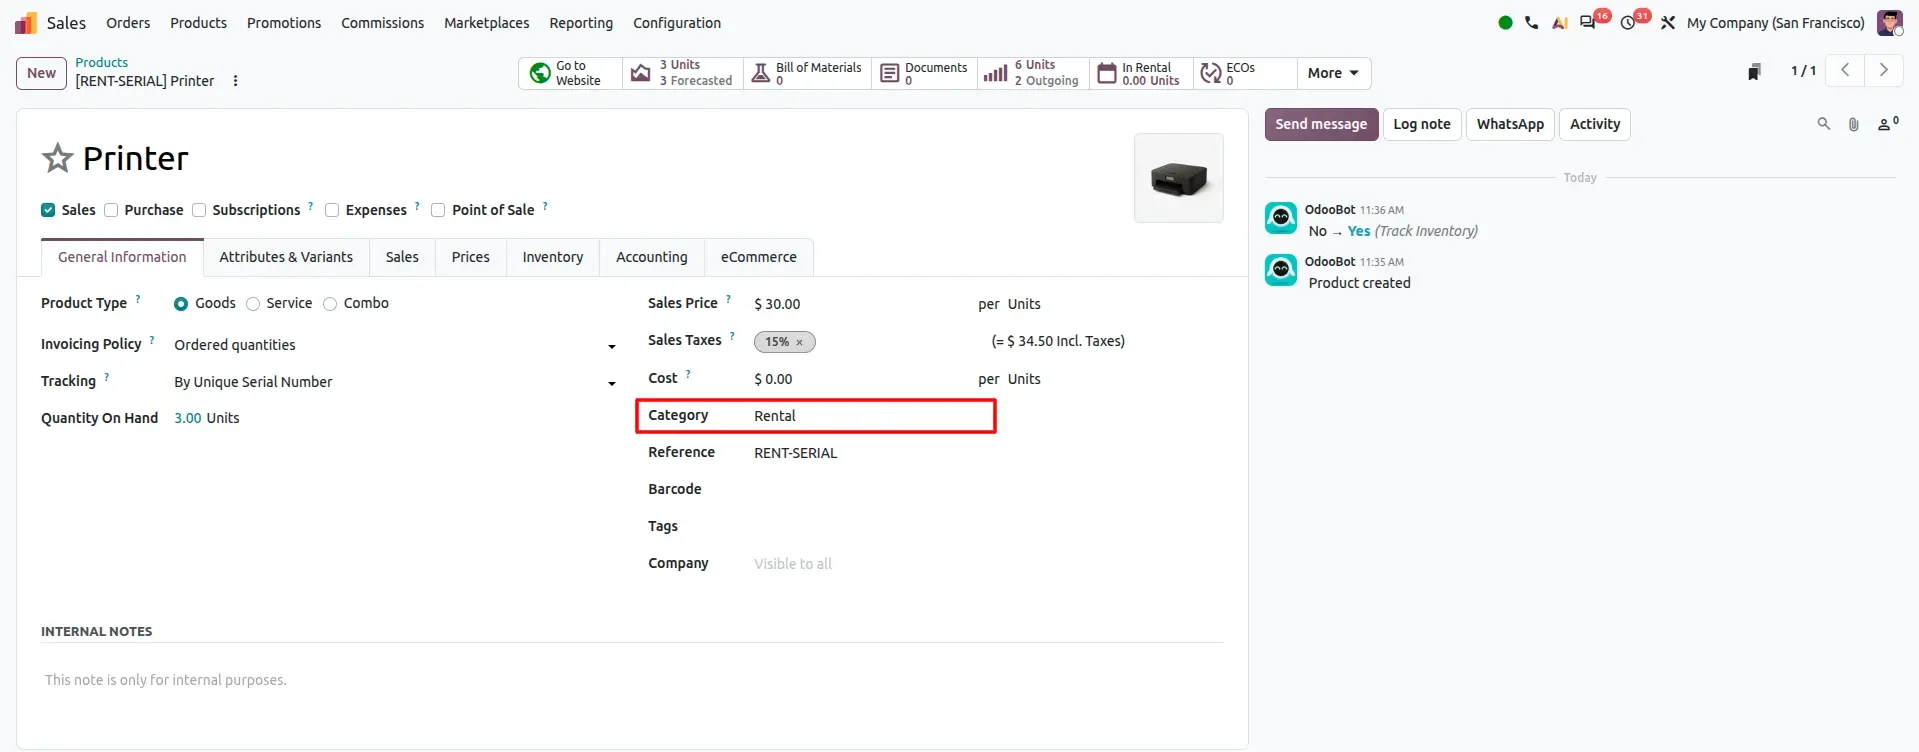
Everything the customer sees on the shop starts with the product form in the Sales app. This example is a serial-tracked Printer with the internal reference RENT-SERIAL.
General Information tab
- Product Type: Goods, with Invoicing Policy "Ordered quantities"
- Tracking: By Unique Serial Number, with the Quantity On Hand shown (3.00 Units in this example)
- Sales Price: $30.00 with a 15% sales tax (= $34.50 including taxes). On the website this rate appears as $30.00 / Hour, matching the Hours periodicity set below
- Category: Rental
- Reference: RENT-SERIAL
- The smart buttons at the top give a live overview: Go to Website, Units Forecasted, Units Outgoing and In Rental (units currently out with customers)
Sales tab: Rental section
The Sales tab has a dedicated Rental section with the settings that control how the product is rented.
| Field | Example | What It Controls |
|---|---|---|
| Periodicity | Hours | The time unit used for the rental price and duration, for example "/ Hour" on the shop |
| Padding Time | 0h 3m | Time kept free after a rental, so the product is not booked again immediately (for example for cleaning or preparation) |
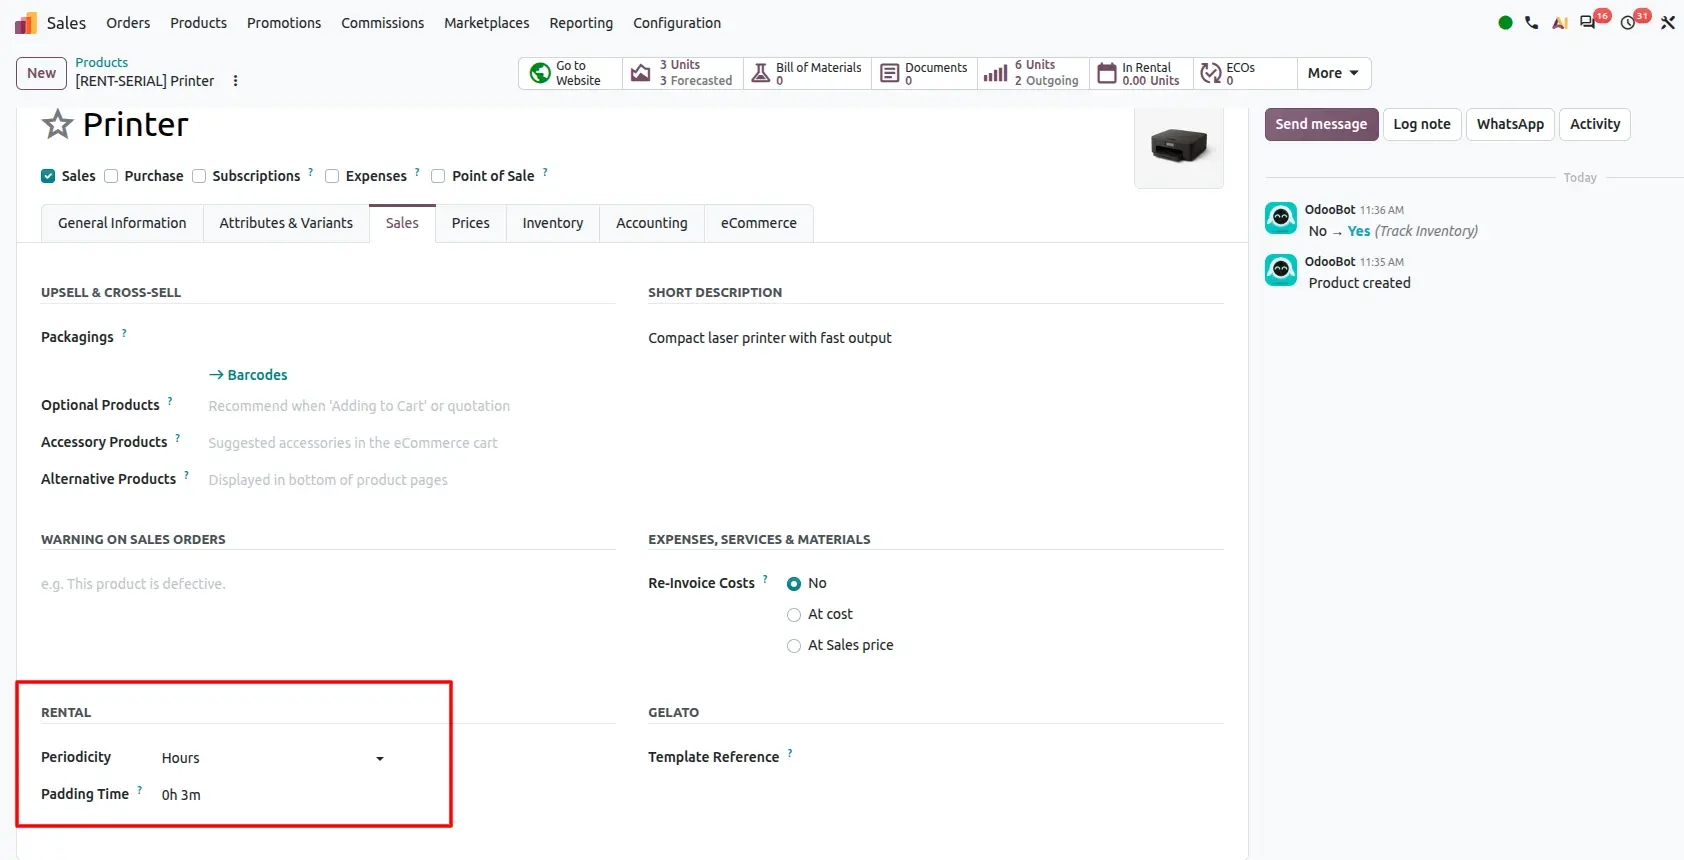
The same Sales tab also holds the eCommerce upsell options (Optional, Accessory and Alternative Products) and a short description, for example "Compact laser printer with fast output", which is what the shop card and cart line display.
20.2 Enabling the Rental Toolbar in the Website Builder
The Rental option sits in the Toolbar row of the Products Page settings, next to Sort by and Search.
- Open Website → Shop and click Edit
- In the right sidebar, open the Style tab and select Products Page
- Find the Toolbar row and switch on Rental
- Click Save
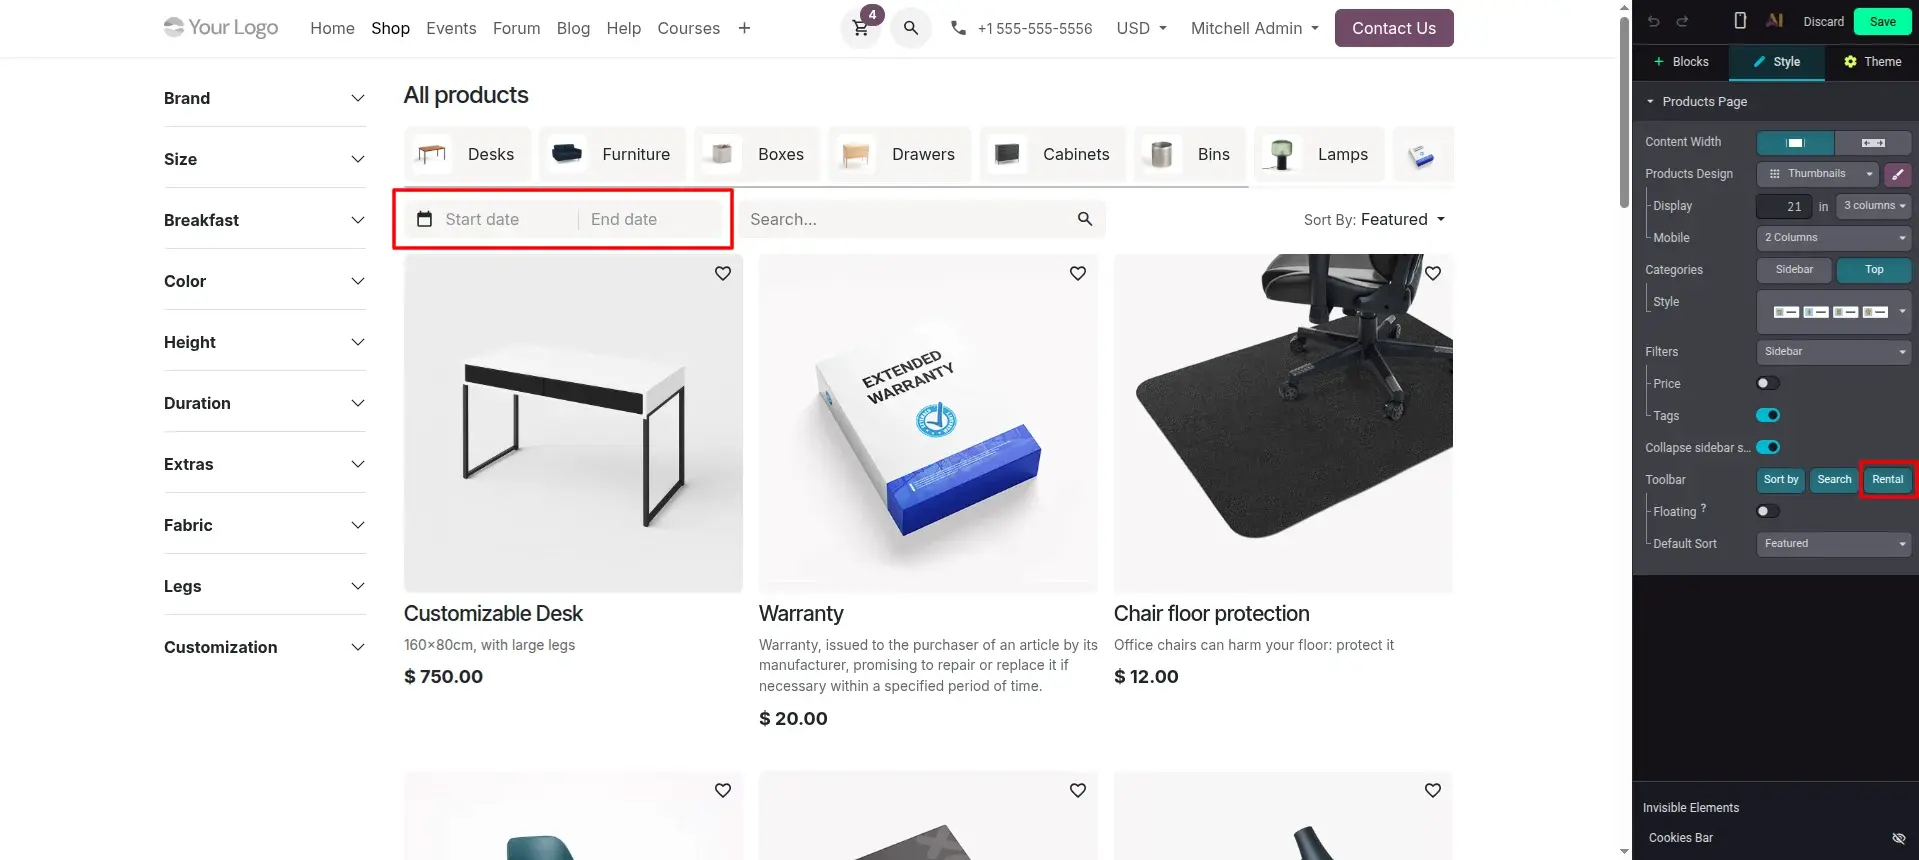
| Toolbar Option | What It Adds to the Shop Page |
|---|---|
| Sort by | Sorting dropdown (for example "Featured") |
| Search | Product search field |
| Rental | Start date / End date picker to choose the rental period |
20.3 Searching the Shop by Rental Period
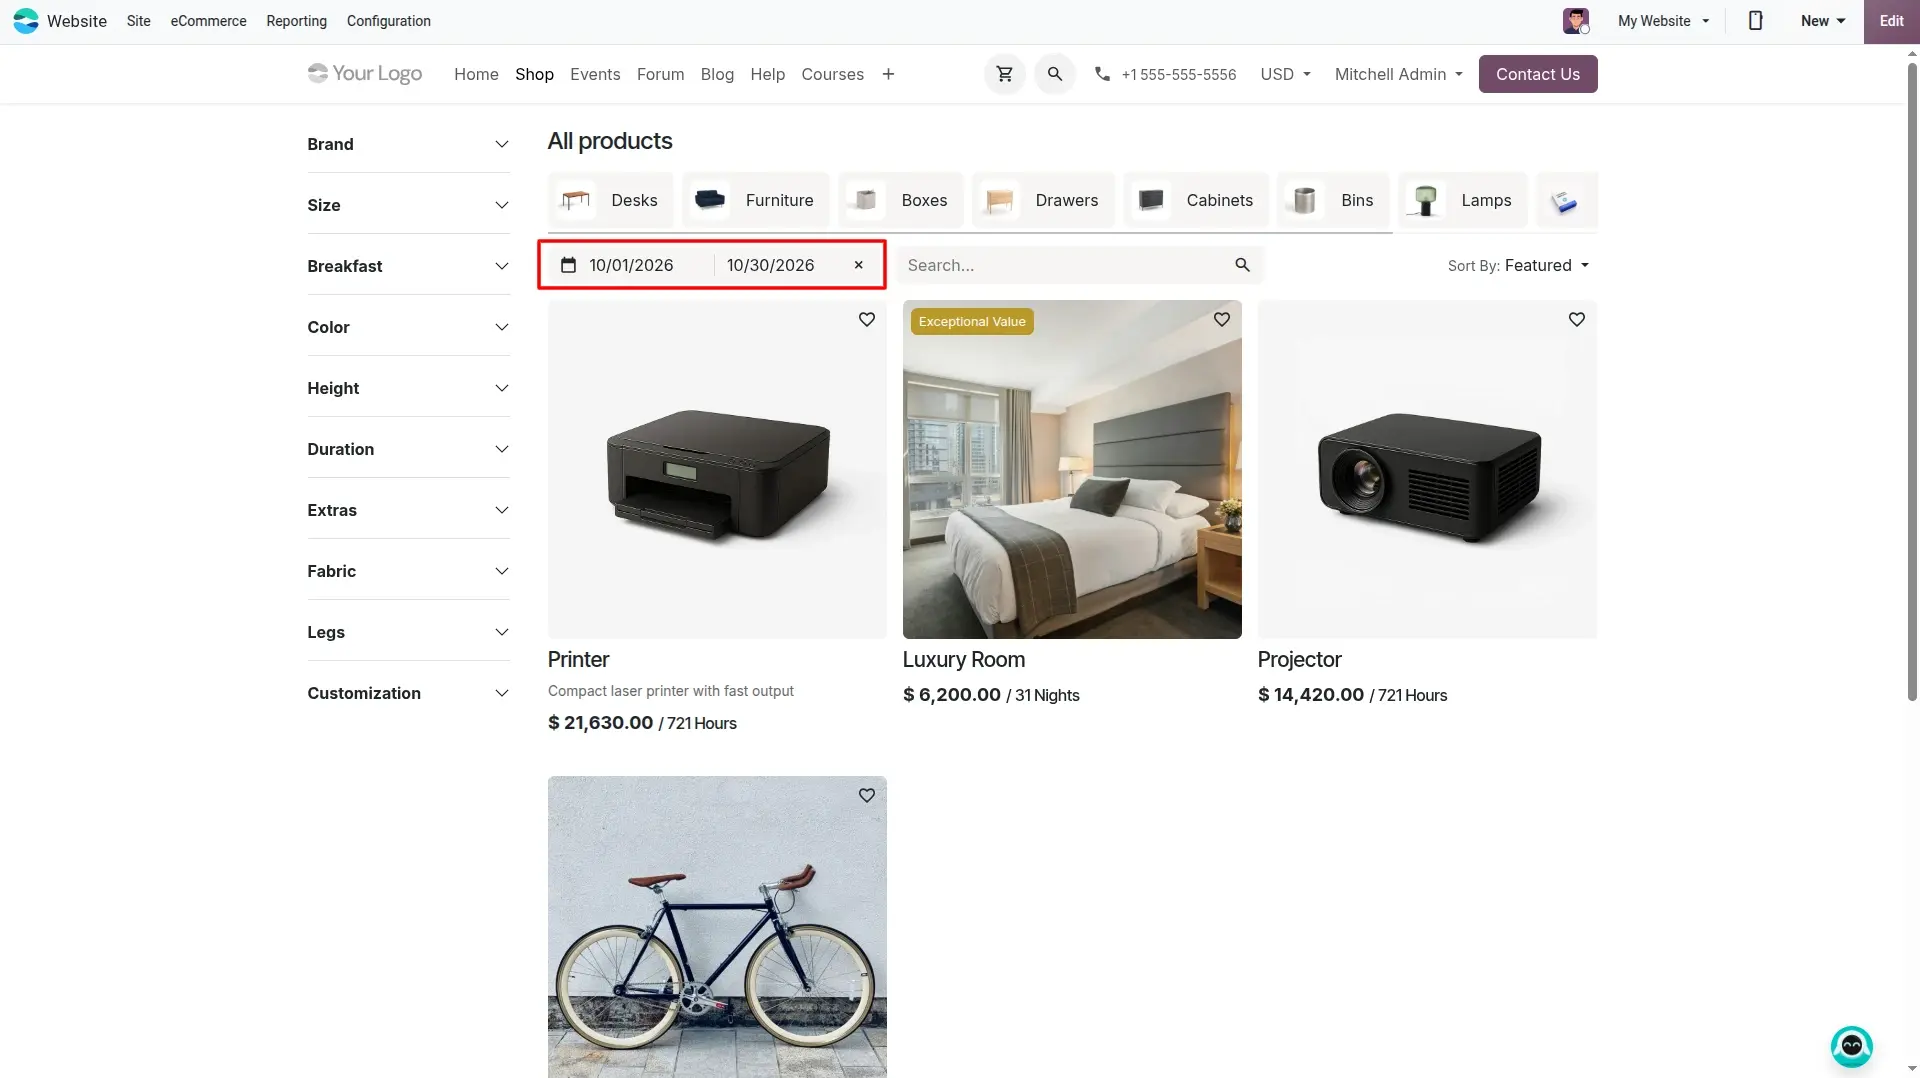
With the toolbar option enabled, the shop shows two date fields labelled Start date and End date, placed to the left of the search bar. Once the customer picks a period, the product cards show the rental price for that period together with its duration.
- Pick the start and end date in the calendar fields, for example 10/01/2026 → 10/30/2026
- Each rental product shows its price and the rental length, such as $21,630.00 / 721 Hours for the Printer or $6,200.00 / 31 Nights for the Luxury Room
- A small ✕ button next to the dates clears the selection
- The category bar, filters, search and sorting keep working alongside the date picker
20.4 Rental Product Page
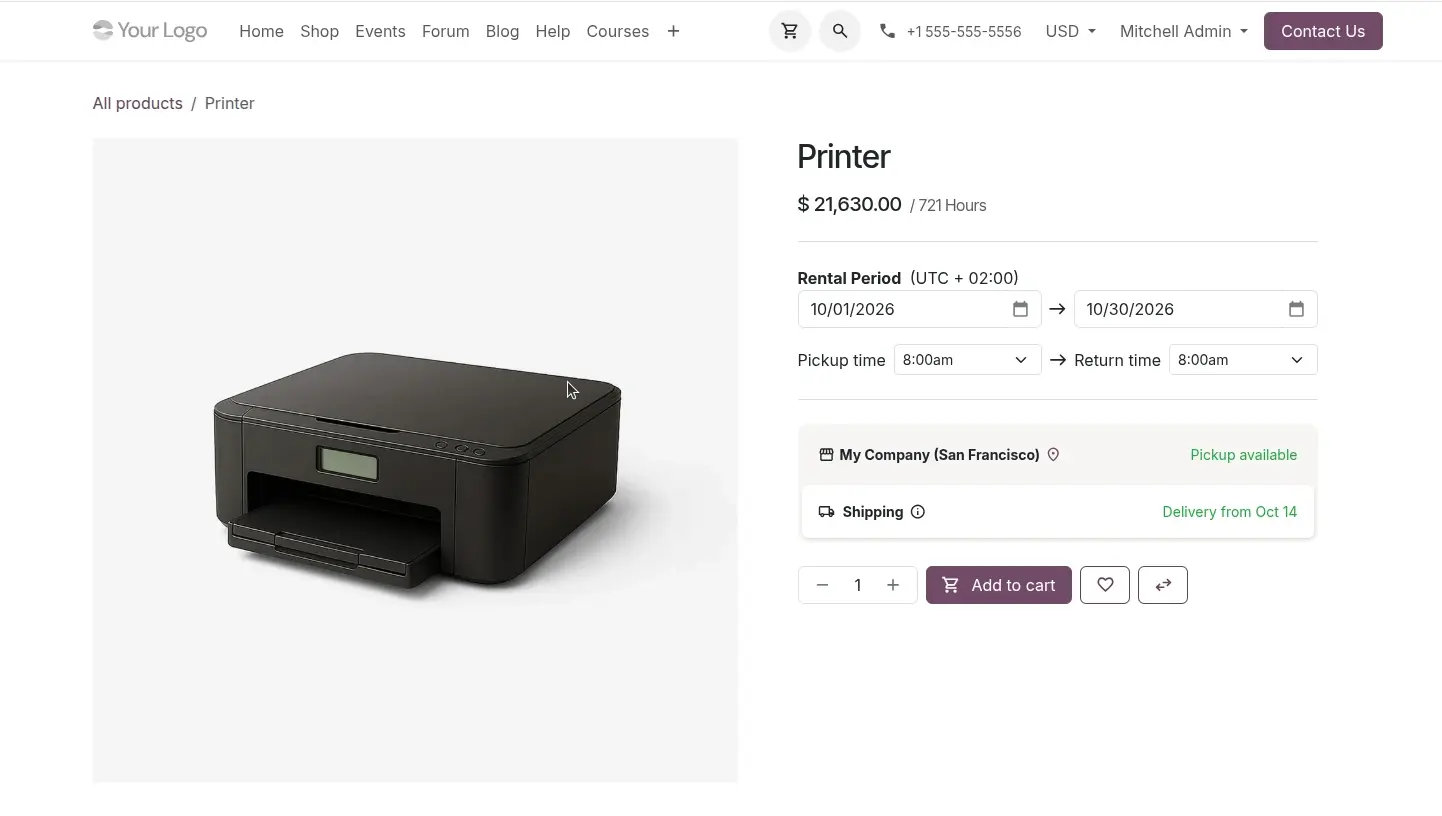
The product page keeps the same rental period and adds pickup and return times. Below it, the availability panel shows whether the item can be picked up at a store or shipped.
- Rental Period with the start and end date fields and the time zone shown next to the label, for example (UTC + 02:00)
- Pickup time and Return time dropdowns, for example 8:00am → 8:00am
- Price shown with the rental duration, for example $21,630.00 / 721 Hours
- Availability panel with Pickup available for the store and a Delivery from date for shipping
- The usual quantity selector, Add to cart, wishlist and compare buttons
20.5 Cart: Order Summary with Rental Period
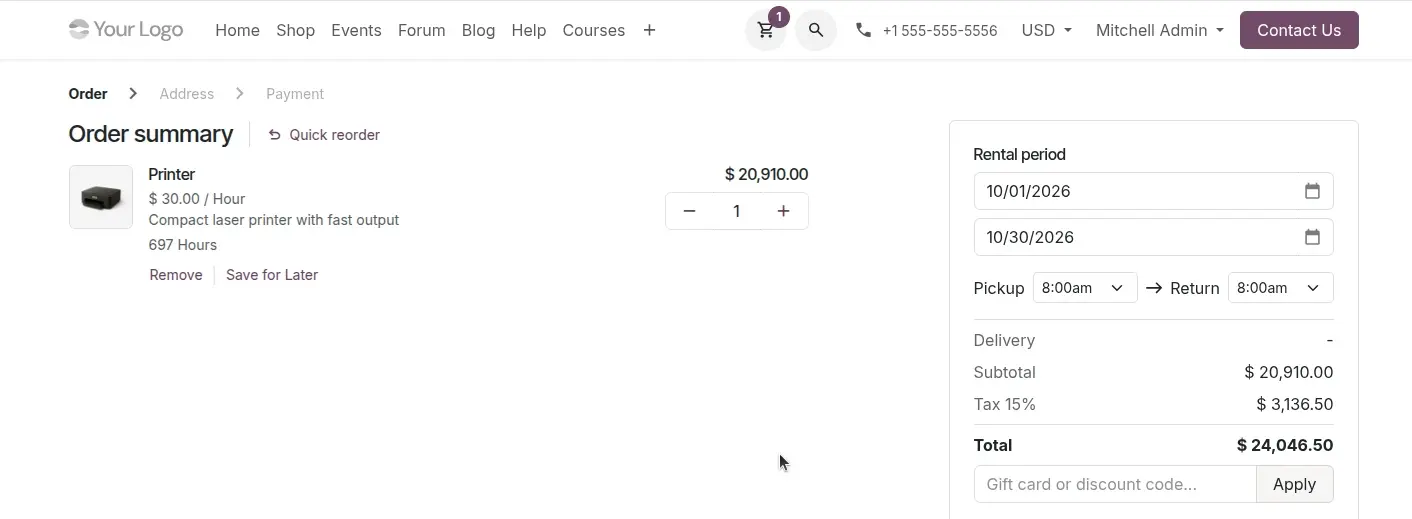
In the cart, the rental period is displayed in its own box at the top of the order summary, where the customer can still change the dates and the pickup and return times.
- The product line shows the hourly rate (for example $30.00 / Hour), the description and the total rental duration (for example 697 Hours)
- The Rental period box has editable start and end dates plus Pickup and Return times
- Totals update below: Delivery, Subtotal, Tax and Total
- The gift card or discount code field and the Quick reorder, Remove and Save for Later links are available as for any other product
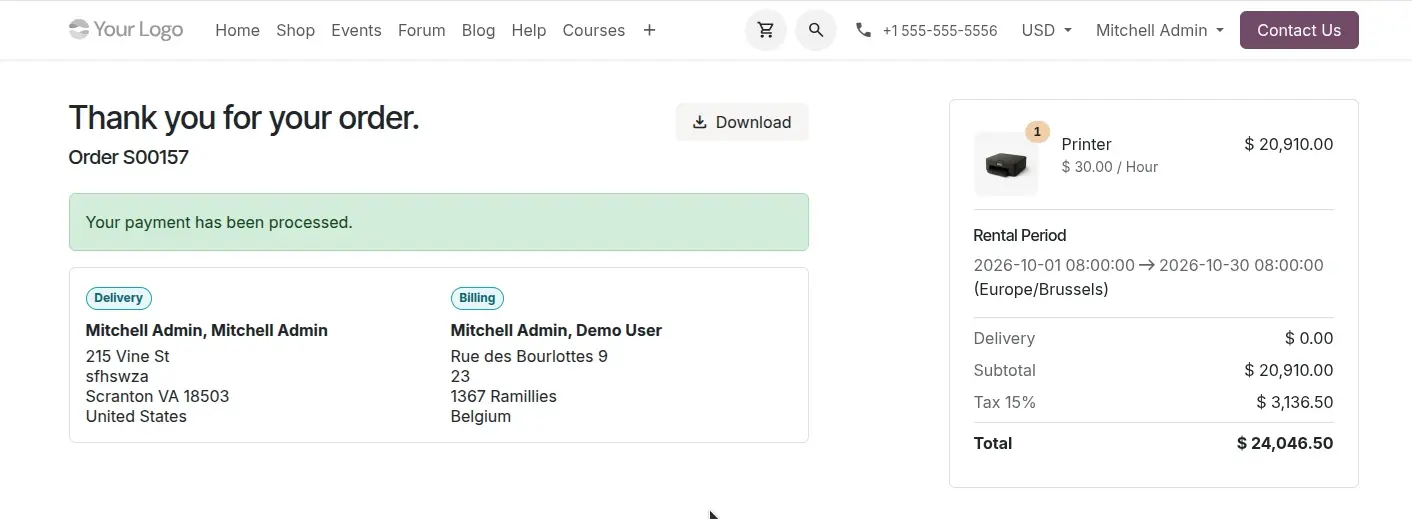
20.6 Order Confirmation Page
After payment, the "Thank you for your order" page repeats the rental period, so the customer has the dates on record.
- Order number (for example S00157) and the "Your payment has been processed" confirmation
- Delivery and Billing address cards
- Order summary with the product, hourly rate, Rental Period (start → end with the time zone, for example Europe/Brussels) and totals
- A Download button for the order document
20.7 Backend: The Rental Sales Order
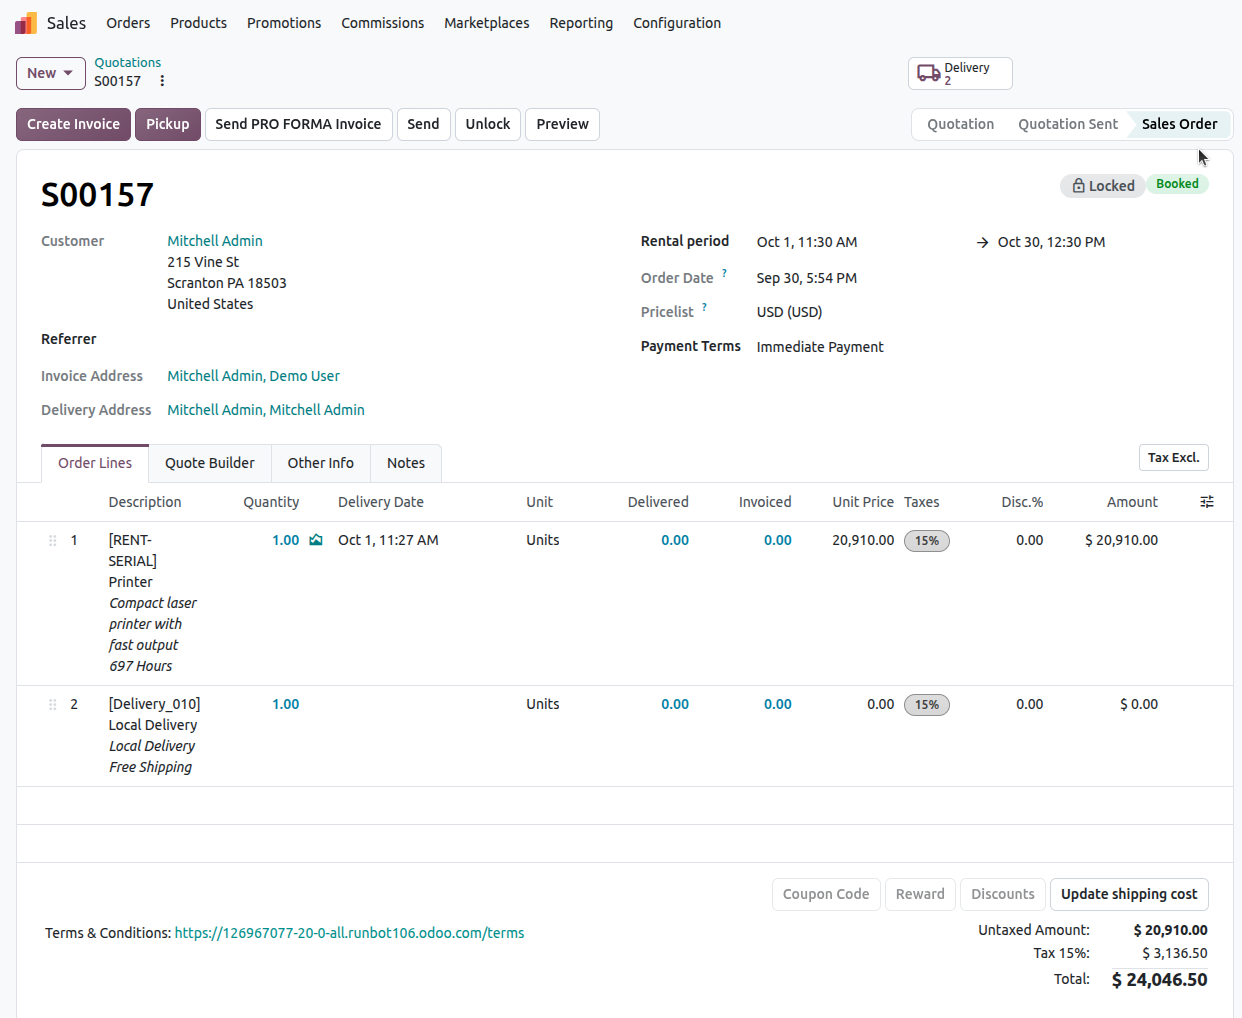
The website order arrives in the Sales app as a normal sales order with rental information, ready to be picked up, returned and invoiced.
- A Rental period field shows the start and end date and time
- The order line shows the rental product with its rental duration (for example 697 Hours), and the delivery method appears as its own line
- The status bar shows Sales Order, with the Locked and Booked badges
- Action buttons include Create Invoice and Pickup
- Times are shown in the timezone of the user viewing the order, so the same period can display different clock times on the website and in the backend
20.8 Rental Flow at a Glance
| Step | Where | What Happens |
|---|---|---|
| 1. Set up product | Sales app → Product form | Category, Periodicity and Padding Time are configured |
| 2. Enable | Website Builder → Products Page → Toolbar | Switch on Rental |
| 3. Choose dates | Shop page | Customer picks Start date and End date |
| 4. Review product | Product page | Sees price for the period, pickup/return time and pickup availability |
| 5. Add to cart | Cart | Rental period box can still be adjusted |
| 6. Pay | Checkout | Confirmation page repeats the rental period |
| 7. Fulfil | Sales app | Sales order with rental period, Pickup and Create Invoice buttons |
Ready to Move to Odoo 20?
Planning to migrate your existing ERP or eCommerce platform to Odoo 20?
Our Odoo experts can help you plan and manage the complete migration, configure your Website and eCommerce platform, integrate business workflows, and optimize your online customer experience. Whether you need Odoo 20 migration, a new eCommerce website, ERP implementation, customization, integration, or ongoing support, share your requirements with us. Fill out the form below and contact our team to discuss your project and find the right Odoo solution for your business.
Odoo 20 Website & eCommerce: Complete New Features Guide