Managing employee expenses efficiently is essential for maintaining financial control, ensuring timely reimbursements, and simplifying accounting operations. Businesses need a reliable way to review expense claims, enforce spending policies, and process employee expenses accurately.
Odoo 20 Expenses introduces three important improvements: consolidated expense reports, expense limits per job position, and salary rules for expense products. These enhancements help businesses streamline expense reporting, establish clearer spending controls, and improve the handling of payroll-related reimbursements.
In this guide, we explore the new Odoo 20 Expenses features, explain how they work, outline their business benefits, and share practical recommendations for implementing them effectively.
What's New in Odoo 20 Expenses?
Two improvements stand out for teams that manage employee expenses. Here is the short version before we go through each one step by step.
Cap the amount by job position
Set the maximum allowable amount per job position, and cap a claim at the authorized limit before final approval.
Assign expense products to salary rules
Link each expense product to its respective salary rule, so every expense type is calculated correctly.
Cap the Amount by Job Position
Odoo 20 lets you define maximum allowable expense amounts per job position. When a claim is above the limit that applies to the employee, the manager can cap the expense at the authorized limit before granting final approval, instead of approving a figure that policy does not allow.
Spending limits usually depend on the role. When those limits live only in a policy document, approvers have to check every claim by hand, and amounts above the allowance can slip through. Putting the limit in Odoo, and letting the manager cap the claim during approval, keeps the approved figure in line with policy.
Configuration Steps
A few one-time steps get the limits working before your next approval round.
Odoo 20 Expense Limits: Operational Instructions
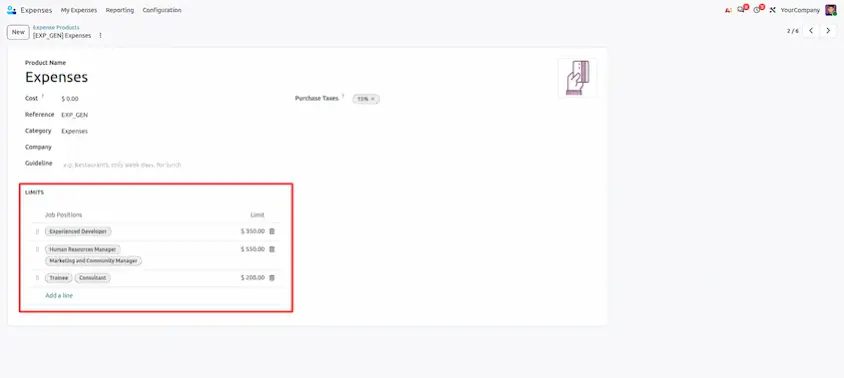
- Navigation path: Expenses ▸ Configuration ▸ Expense Products ▸ [Select Product], to set or review the limit.
- In the Limits table, click Add a line, select the job position(s), enter the maximum allowable amount and save. That limit now applies to employees holding those positions.
- Employees log and submit their expenses as usual. Managers with approval rights open them from Expenses ▸ Expense or Expense to Process.
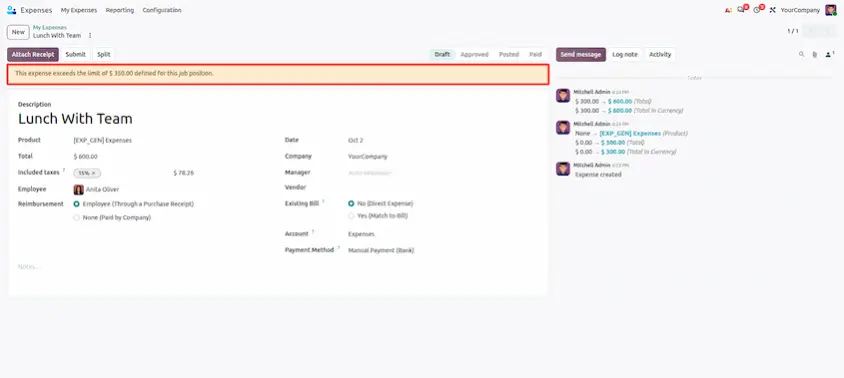
- Where a claim is above the limit, Odoo shows a warning on the expense. Edit the Total to the authorized limit to cap it, then approve.
Assign Expense Products to Salary Rules
Expense products can now be assigned to the respective salary rule to ensure the correct calculation of the respective expense type. When an expense is approved and processed through Odoo Payroll, it follows the rule assigned to its expense product, with no manual mapping or corrections, so each expense type is calculated the way it should be.
Different expense types are often calculated differently in payroll, for example reimbursed as-is, taxed or added to a specific payslip line. If that mapping is done by hand, amounts can land in the wrong place. Assigning each expense product to its respective salary rule keeps the calculation consistent for every expense type.
Configuration Steps
A few one-time steps connect your expense products to the right salary rules.
Odoo 20 Salary Rule Setup: Operational Instructions
- Enable Reimburse in Payslip: Expenses ▸ Configuration ▸ Settings ▸ Expenses

- Navigation path: Expenses ▸ Configuration ▸ Expense Products ▸ [Select Product], then choose the salary rule.

- Select the salary rule that matches the expense type and save. Claims logged with that product are now calculated through it.

- Employees log and submit expenses as usual, choosing the expense product that fits the claim and setting Reimbursement to Employee (Through a Payslip).

- Managers approve the expense (capping it first if it is above the limit). The expense must be approved before the payslip is computed.
- Open the employee's payslip and click Compute. The approved amount appears in the Salary Computation tab as Expenses Reimbursement.

Odoo 20 Expenses Configuration Checklist
Use this short list to set up a test instance in the right order.
How These Features Change the Expenses Workflow
Taken together, the direction of Odoo 20 Expenses is a more controlled process with less manual checking:
Here is how a typical expense claim can flow:
- Set up the job position once: the maximum allowable amount is stored against the position.
- Employee logs the expense: the claim is created and submitted in the usual way.
- Manager reviews and caps: if the amount is above the limit, Odoo shows a warning and the manager caps it at the authorized amount before final approval.
- Salary rule applies: the expense product's assigned salary rule drives how the approved amount is calculated.
- Reimburse through the payslip: with Reimbursement set to Employee (Through a Payslip), the approved amount appears under Salary Computation when the payslip is computed.
Odoo 20 Expenses brings practical improvements that make expense handling more structured and less repetitive. Maximum amounts per job position let managers cap claims at the authorized limit before final approval, and assigning expense products to the respective salary rule ensures the correct calculation of each expense type, creating a more connected workflow for managing limits, approvals and payroll more efficiently.
Odoo 20 Expenses: New Features and Updates