Replenishment in Odoo: The Secret to Never Running Out of Stock
"We ran out of stock again and lost three big orders this week." Sound familiar? You're not alone. Stock outs are one of the most painful and avoidable problems in any business.
If you're using Odoo (or thinking about it), you already have everything you need to never run out of stock again. The feature is called "Replenishment" and once you understand it, you'll wonder how you ever managed without it. Let's break it down in plain language.
What Is Replenishment in Odoo?
Replenishment is Odoo's intelligent inventory system that continuously monitors stock levels and automatically creates purchase or manufacturing orders before products run out.
Think of it as a smart inventory assistant that:
➜ Tracks every product in real time.
➜ Alerts you—or takes action automatically—when stock reaches low levels.
➜ Creates purchase orders from the right supplier at the right time.
➜ Helps ensure your business is always ready to serve customers.
Why it matters: Instead of manually checking inventory every day, Odoo handles the monitoring and replenishment process automatically, helping reduce stockouts, save time, and improve inventory accuracy.
Why Replenishment Matters?
Let's be honest—many businesses still track inventory manually using spreadsheets or rely on guesswork. As the business grows, this often leads to two expensive inventory problems:
The Good News
Odoo Replenishment automatically keeps your inventory in the "Goldilocks Zone"—maintaining the right stock levels so you avoid both shortages and excess inventory while improving cash flow and customer satisfaction.
Types of Replenishment Strategies
Before we dive into the setup, you need to understand the two core strategies Odoo offers:
Odoo also supports a Make to Stock + Make to Order (MTS + MTO) strategy. If stock is available, Odoo uses it immediately. Otherwise, it automatically creates a new replenishment order.
How to Configure Replenishment in Odoo
Let's walk through the actual configuration inside Odoo. This is where it gets practical.
Step 1: Enable the Right Settings
First, make sure your Odoo instance has the right features turned on. Go to: Inventory → Configuration → Settings
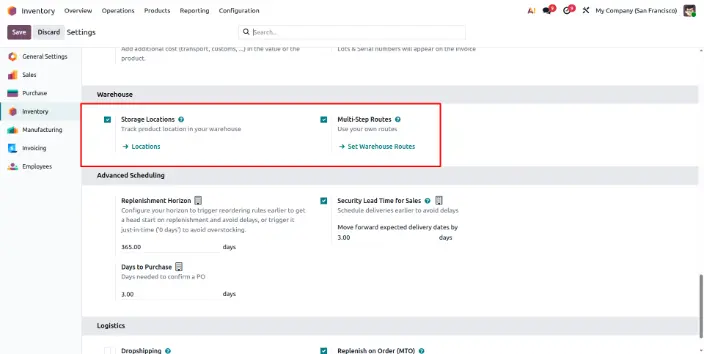
Make sure the following are enabled:
Storage Locations
RequiredAssign replenishment rules to individual warehouse or storage locations.
Multi-Step Routes
RecommendedSupports advanced warehouse workflows such as Pick → Pack → Ship.
Replenish on Order (MTO)
MTO RouteEnable this Logistics route to use the Make to Order replenishment strategy.
Click Save after enabling.
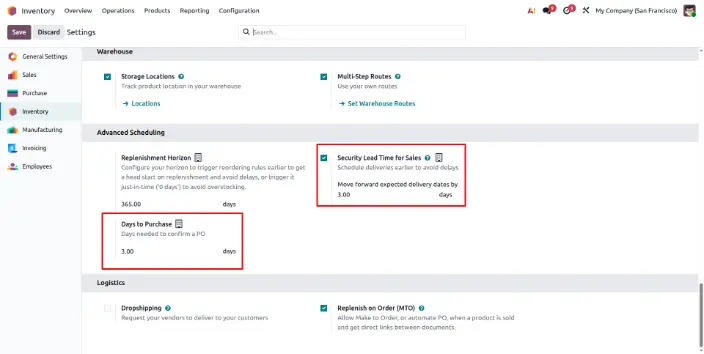
Also scroll down to find under Advanced Scheduling:
📅 Days to Purchase
RequiredNumber of days your internal team needs to confirm and send a purchase order to the supplier.
🛡️ Security Lead Time
OptionalBuffer before committing stock to a customer. Applies only to outbound deliveries.
Click Save after enabling.
Step 2: Configure the Product Routes & Supply Method
Now go to your product: Inventory → Products → Products → [Open a Product]
Click on the Inventory tab inside the product form.
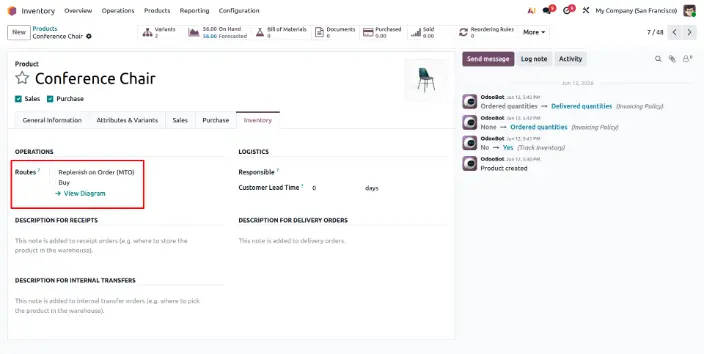
Set the Route
Select which route applies to this product:
Buy
Creates a Purchase Order automatically whenever stock needs replenishment.
Manufacture
Generates a Manufacturing Order instead of purchasing from a vendor.
Make to Order
Replenishment starts only after a Sales Order is confirmed.
Buy + MTO
Uses available stock first, then creates a Purchase Order only if replenishment is needed.
Set Vendor (for Buy Route)
Make sure the correct option is checked at the top of the product form and go to the Purchase tab of the product form.
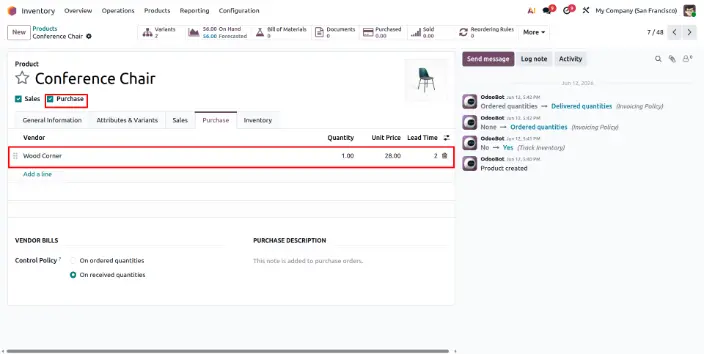
Open the Purchase tab and make sure at least one Vendor is configured with a price. Otherwise, Odoo won't know which supplier to purchase from during replenishment.
Step 3: Set Up Reordering Rules (Min/Max)
This is the core of the Make to Stock strategy.
Navigate to: Inventory → Operations → Replenishment
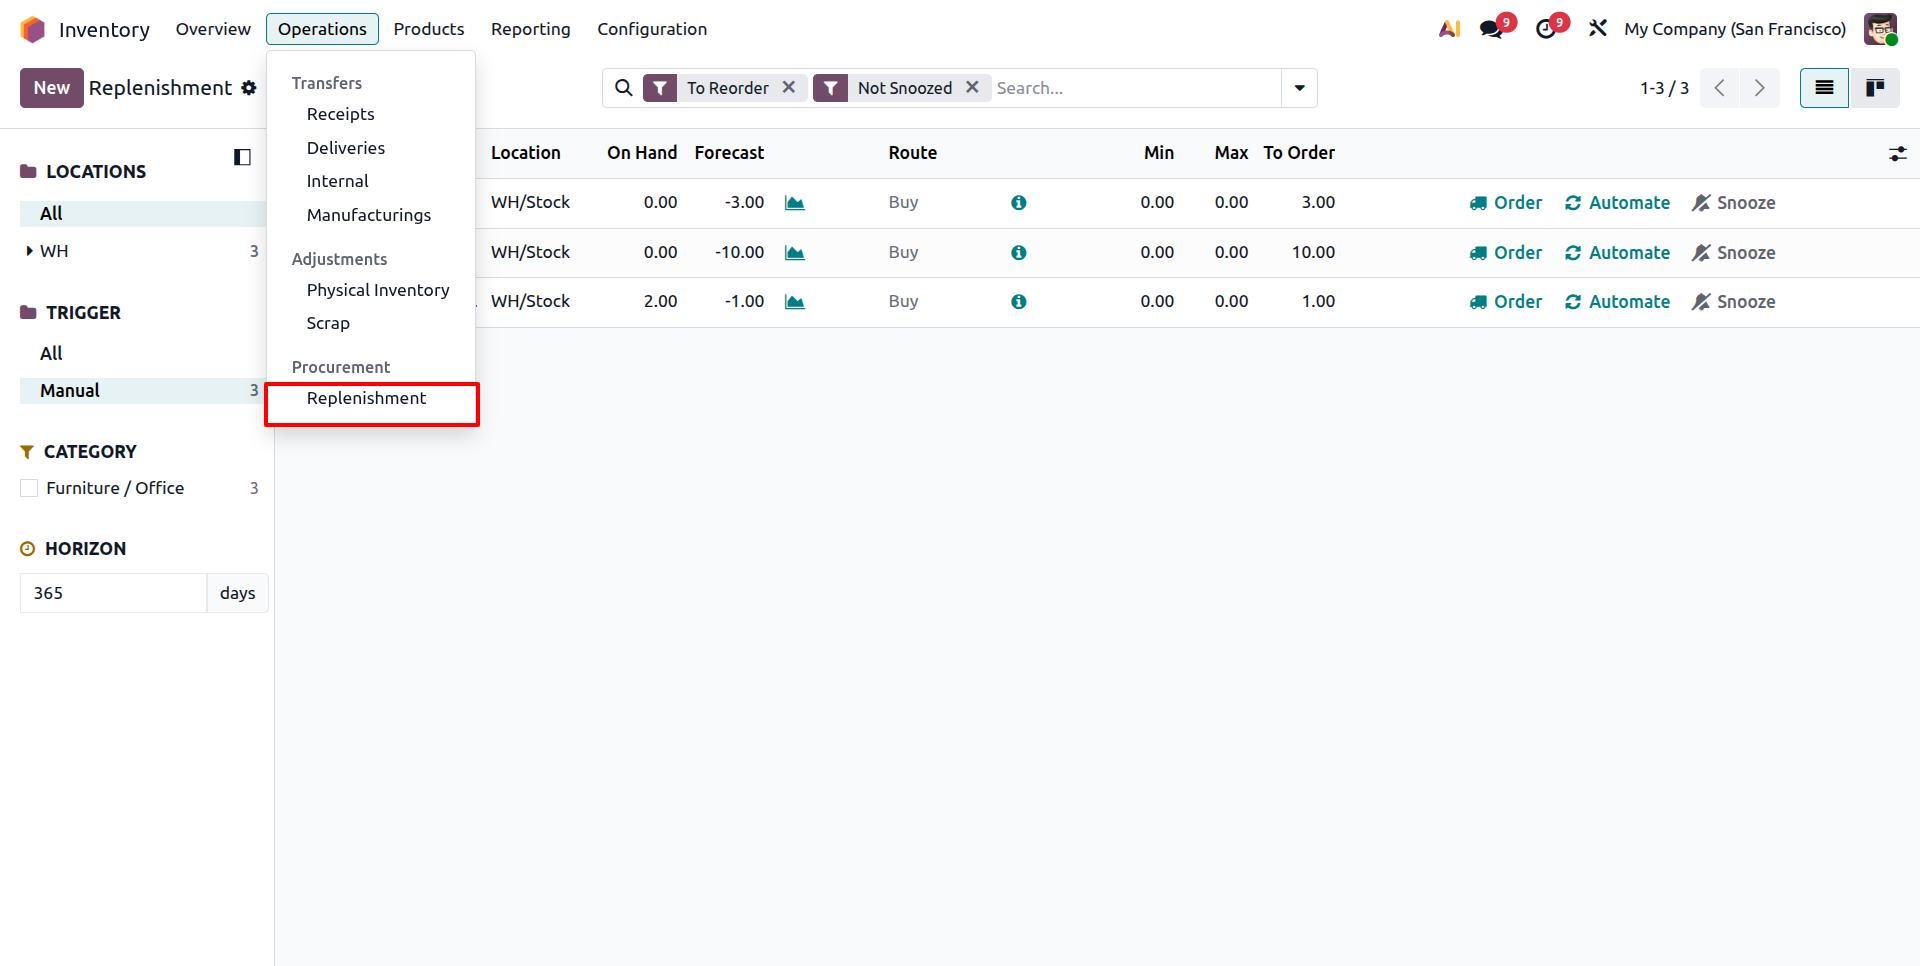
The replenishment dashboard is more visual. You can see On Hand, Forecasted Qty, and To Order all in one row per product. Click "New" to create a rule, or click on an existing product row to edit.
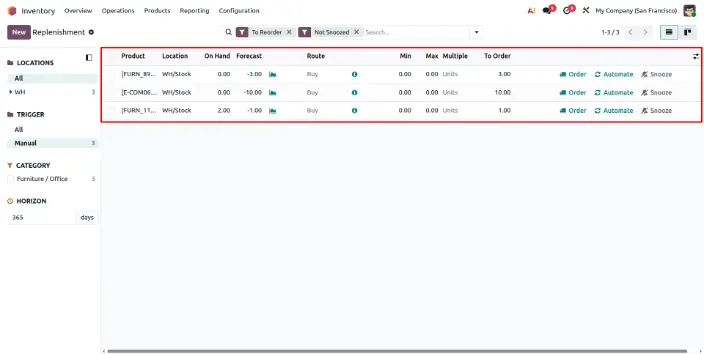
Here's what each field means:
Example in Real Life:
You stock printer cartridges. You never want fewer than 10. You want max 60 at a time (supplier sells in packs of 10).
• Min Qty: 10
• Max Qty: 60
• Qty Multiple: 10
When stock hits 8, Odoo orders 50 more → next pack brings you to 58. Clean and automatic.
Step 4: Understand Lead Times
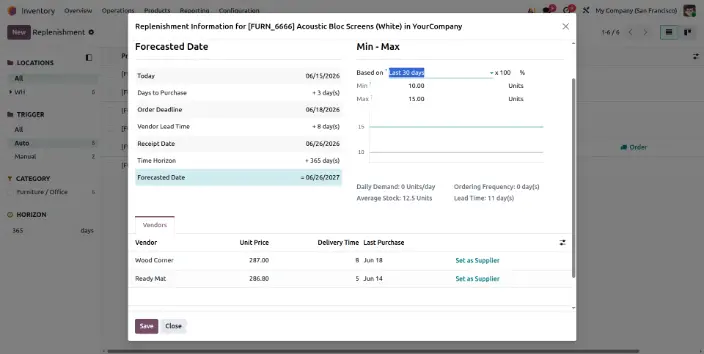
Lead times are the most misunderstood part of replenishment. Get them wrong, and orders will be created too late and you'll still run out.
There are three layered lead times that work together:
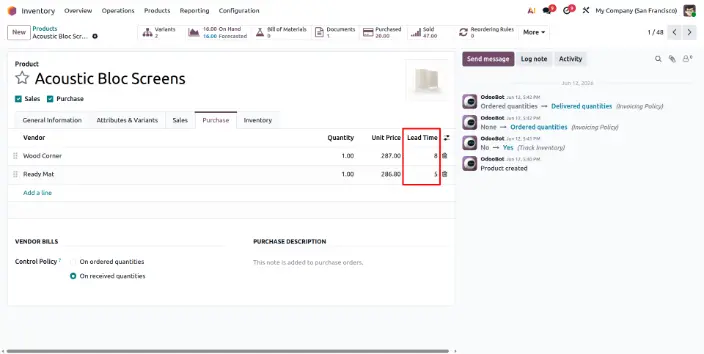
Vendor / Supplier Lead Time
The time your supplier takes to deliver products after receiving the Purchase Order.
Days to Purchase
The internal time required to review and approve a Purchase Order before it is sent to the supplier.
Security Lead Time for Sales
Adds a delivery buffer by scheduling customer deliveries earlier. This affects outbound deliveries only and does not impact purchasing.
Step 5: Triggering Replenishment
Once your replenishment rules are configured, Odoo can generate supply orders either manually or automatically.
1. Manual Replenishment (On-Demand)
Inventory → Operations → Replenishment
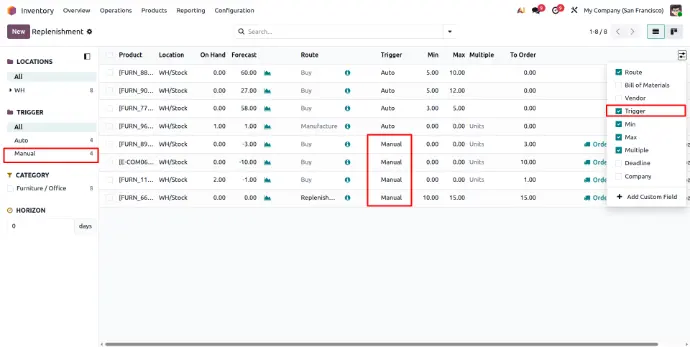
By default, Odoo displays only products that need replenishment because their stock is below the minimum level or a future shortage is expected.
Click Order to generate a one-time Purchase Order or Manufacturing Order. Select Automate if you want Odoo to handle replenishment automatically during future scheduler runs.
2. Automatic Replenishment (Scheduler)
Runs automatically through Odoo's scheduled action (Cron Job)
Odoo periodically checks all replenishment rules in the background. If a product falls below its required stock level, it automatically creates the necessary supply order without manual intervention.
Step 6: Review and Confirm the Purchase Order
After replenishment runs, the order lands in: Purchase → Orders → Requests for Quotation
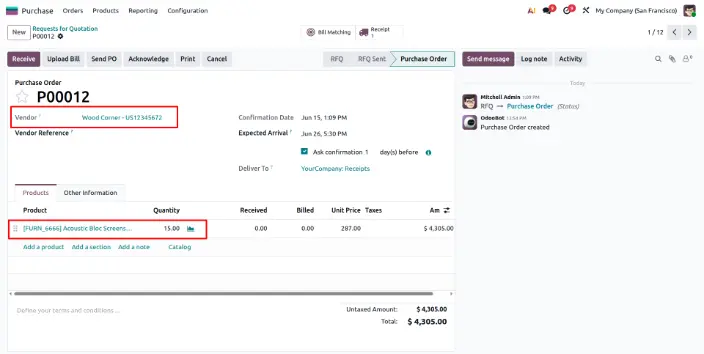
Forecasted Demand View
One of the nicest additions in Odoo is the Forecasted Demand view inside the replenishment screen.
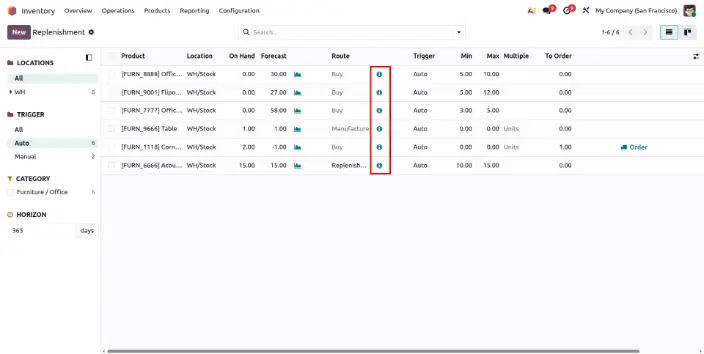
This view shows you:
→ Current stock level
→ Incoming stock (from confirmed POs)
→ Outgoing demand (from confirmed Sales Orders)
→ Forecasted stock over the next 30/60/90 days
This helps you spot problems before they happen, not after you've already run out.
Multi-Warehouse Replenishment
If your business operates multiple warehouses or retail locations, Odoo handles inter-warehouse replenishment natively.
Go to: Inventory → Configuration → Warehouses → [Select a Warehouse]
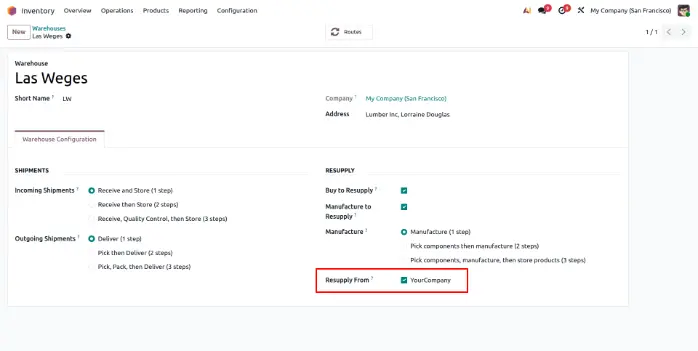
Enable "Resupply from [Main Warehouse]" and Odoo will automatically create Internal Transfer orders to move stock from your main warehouse to a branch instead of creating a new purchase order.
This is extremely powerful for:
Retail Chains
Ideal for businesses operating multiple retail stores from one central warehouse.
Manufacturing
Perfect for production businesses managing inventory and distribution together.
Regional Hubs
Best when regional warehouses receive stock from one central distribution center.
Real-World Business Example
Medical Supply Distributor
A company operating two warehouses where Branch B receives inventory from the Main Warehouse through internal transfers.
Branch B frequently ran out of critical medical supplies while the Main Warehouse still had excess inventory.
Odoo Configuration
Resupply Branch B from Main WH
50 Units
200 Units
1 Day (Internal Transfer)
What Happens?
Zero stockouts. Zero manual coordination.
Odoo automatically replenishes Branch B whenever stock falls below the defined minimum level, ensuring products remain available without manual intervention.
Business Benefits
Operational Efficiency
Eliminate hours of manual stock audits and data entry.
Optimized Cash Flow
Stop over-investing in slow-moving inventory and free up working capital.
Improved Service Levels
Ensure products are always available, leading to higher customer satisfaction and repeat business.
Data-Driven Decisions
Leverage Odoo's forecasting to scale your procurement with actual demand trends.
Enhance Your Workflow with GritXi Odoo Apps
To further optimize your replenishment and inventory management, consider these specialized GritXi modules:
GritXi Secondary UOM: Manage products in multiple units of measure, crucial for complex raw material replenishment.
GritXi Stock Picking Tags: Organize and prioritize your incoming replenishment shipments for faster processing.
GritXi Minimum Product Quantity: Enforce minimum purchase quantities on the website shop, including variant-level controls, useful for supplier pack sizes and replenishment planning.
GritXi Product Low Stock Notification: Get real-time alerts when items hit critical levels, ensuring you never miss a replenishment window.
GritXi Section/Line in Delivery Slip: Improve delivery slip clarity by adding sections and notes to stock transfers, which helps with cleaner warehouse documentation.
Conclusion
Replenishment in Odoo is no longer just a feature, it's a fully automated supply chain safety net.
Once configured:
You'll never manually check stock again
Purchase orders appear before you even realize you're running low
Your team focuses on growth, not firefighting stockouts
Whether you run a single store or a multi-warehouse distribution network, Odoo's replenishment system grows with you — and protects your business every single day.
FAQ
Q: Can I use different replenishment rules for different warehouses?
A: Yes, Odoo allows you to set location-specific reordering rules so you can manage stock levels independently for each branch.
Q: What happens if Odoo triggers a replenishment but there is no vendor set?
A: The replenishment will appear in your dashboard, but Odoo cannot generate a Purchase Order. You must ensure at least one vendor is configured in the product form.
Q: Does the scheduler run automatically?
A: Yes, Odoo typically runs a background cron job once a day to check reordering rules, but you can also trigger it manually at any time.
How to Set Up Replenishment in Odoo for Better Stock Control