Odoo 18 has arrived with several enhancements across its modules, and one standout area of improvement is the Point of Sale (POS) system. With a cleaner UI, better performance, and improved modularity via OWL JS (Odoo Web Library), customizing the POS screen is more intuitive and powerful than ever. In this blog, we’ll walk you through how to add a custom button to your Odoo 18 POS screen, enabling tailored functionality to match your business needs.
Why Customize the POS Screen in Odoo 18?
The POS screen is the heart of in-store operations. Enhancing its functionality can:
- Improve cashier productivity by reducing repetitive actions
- Trigger custom workflows like loyalty point checks, quick discounts, or receipts
- Add business-specific logic without cluttering the backend
Instead of altering core code, you can extend POS capabilities cleanly using OWL components.
Understanding the POS Architecture in Odoo 18
Odoo 18's POS frontend is built using OWL JS, a modern JavaScript framework based on a component structure. Here’s a basic overview:
- Frontend: Built using OWL JS with components like ProductScreen, PaymentScreen, etc.
- Backend: Uses Odoo’s Python models and controllers
- Communication: Happens via RPC (Remote Procedure Call) between the frontend and backend
To customize, you’ll typically:
- Extend or patch a frontend component
- Add your logic using JavaScript
- Optionally call backend methods using RPC
Step-by-Step Guide to Add a Custom Button in Odoo 18 POS
Step 1: Create a Custom Module
Structure your custom module:
custom_pos_button/
├── __manifest__.py
├── static/
│ └── src/
│ └── js/
│ └── CustomButton.js
└── xml/
│ └── CustomButton.xml
manifest.py:
{
'name': 'Custom POS Button',
'depends': ['point_of_sale'],
'assets': {
'point_of_sale.assets': [
'custom_pos_button/static/src/js/CustomButton.js',
'custom_pos_button/static/src/xml/CustomButton.xml',
],
},
}
Step 2: Add the Button Component with OWL
Create CustomButton.js:
import { PosComponent } from '@pos/core/component';
import Registries from '@pos/core/registry';
import { ConfirmPopup } from "@point_of_sale/app/utils/confirm_popup/confirm_popup";
class CustomButton extends PosComponent {
onClick() {
this.showPopup(ConfirmPopup, {
title: 'Custom Action',
body: 'You clicked the custom button!',
});
}
}
CustomButton.template = 'CustomButton';
Registries.Component.add(CustomButton);
export default CustomButton;
Step 3: Inject Button into POS Screen
To add it to the ProductScreen:
import { ProductScreen } from "@point_of_sale/app/screens/product_screen/product_screen";
import CustomButton from './CustomButton';
const ProductScreenWithButton = (ProductScreen) =>
class extends ProductScreen {
setup() {
super.setup();
}
get buttons() {
return [
...super.buttons,
{
component: CustomButton,
position: 'left',
},
];
}
};
Registries.Component.extend(ProductScreen, ProductScreenWithButton);
Step 4: Add Backend Logic
In models.py, add:
class PosCustomAction(models.TransientModel):
_name = 'pos.custom.action'
@api.model
def fetch_loyalty_points(self, partner_id):
partner = self.env['res.partner'].browse(partner_id)
return {'points': partner.loyalty_points}
In JS:
const result = await this.rpc({
model: 'pos.custom.action',
method: 'fetch_loyalty_points',
args: [partnerId],
});
Sample Use Case: Add a “Loyalty Check” Button
Let’s say you want to add a button that fetches and shows customer loyalty points:
- On click, the button checks if a customer is selected.
- It then makes an RPC call to fetch loyalty points.
- Finally, it displays the points in a popup.
This is perfect for stores with customer loyalty programs.
Best Practices for POS Customization
- Keep It Modular: Avoid hardcoding; use dynamic data
- Optimize UI: Avoid cluttering the screen
- Use RPC Wisely: Keep calls async, show loading indicators
- Version Control: Track your changes using Git
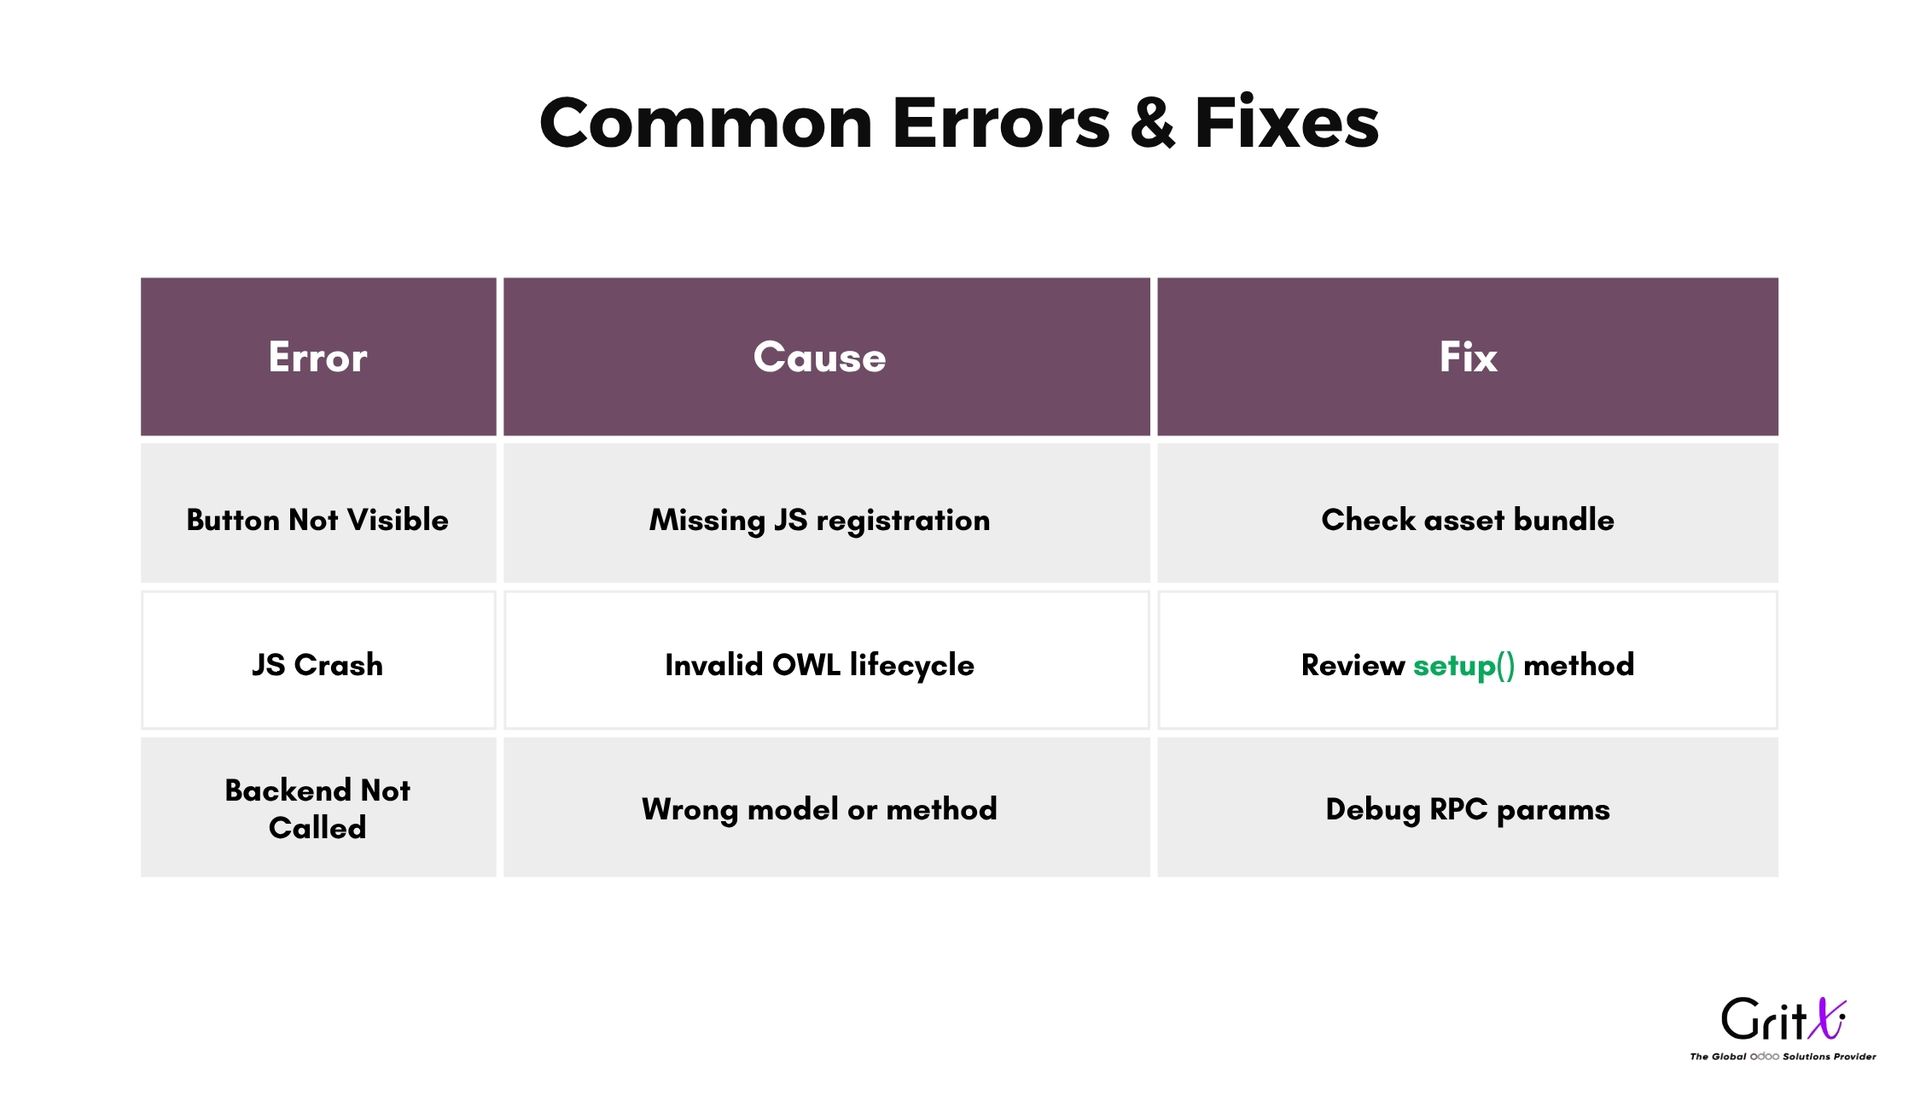
Common Errors & Fixes
Final Thoughts
Customizing the Odoo 18 POS screen isn’t just for developers—it’s a way for businesses to tailor operations to their needs. Adding a custom button opens the door to limitless possibilities—loyalty programs, discounts, quick actions, and more.
With OWL JS and a modular architecture, Odoo 18 makes customization straightforward, clean, and powerful. Ready to take your POS to the next level?
FAQs
Q: Can I add multiple custom buttons?
Yes, you can register multiple button components and place them anywhere on the screen.
Q: Is it upgrade-safe?
As long as you don’t modify core files and follow modular practices, your changes are safe.
Q: Can I control button visibility?
Absolutely. Add logic to check user roles or POS configuration.
How To Customize Your Odoo 18 POS Screen with A Custom Button ?